How to get to the power plant in the game prey. Walkthrough of Prey (2017)
11. Cargo compartment
Prey 2 walkthrough
Task: Receiving and sending
At the entrance on the top floor we are met by Austin Cool, we get to him by shooting local phantoms. You can climb to the upper bridge from the side lifts; we climb onto the boxes, onto the locked airlock, and from it we jump onto the bridge.
The surviving people took refuge in a two-story room. They locked themselves out from the monsters and are now holding the line, but resources are already running out. In the back room we find the leader of the survivors - Sarah Elazar. She asks us to get turrets, and for this we need drawings and a working fabricator.
Nearby on the table there are 4 neuromods and an audio recording. There's a book in the side room Lord of the Stars. Volume 5". In the second half of the shelter, where a girl is sitting on the floor, we find a book." Lord of the Stars. Volume 3". Among the rescued there is Kevin Hag, he will ask to save his wife from another compartment - add. task "With this ring".
Objective: Cargo Bay Defense
Through the airlock we go out into space again. You don't have to fly far, the drawing of the "Liquidator" is in the hole to the left of the exit. He is under the protection of the weaver, but there is no need to engage in battle; you can quickly dial the safe code, pick up the drawing, and return to the station.
Fuel storage compartment. We return to the main hall, we see a locked door to the “Cargo Power Control” energy saving department. You can get there through a corridor with fiery jets (along the way we find 3 corpses and an audio recording), or crawl over the door into the ventilation hatch by building a staircase with a gypsum cannon. In the room, press the button on the screen and turn on the power supply to the entire compartment. The recycler and fabricator will start working.
Having the drawing, we approach the fabricator and create a portable turret. But all three turrets can also be found ready-made:
1. In the leftmost airlock, at the top of the inclined elevator.
2. In an open container in the center, which is suspended from a crane. The crane control panel is located on the central road. Using this crane, we lift the first turret into the shelter.
3. On the lower floor of the shelter we examine the computer; the user’s password is hidden next to it under the phone. Using the computer, we open the side bars and find a turret on one of the shelves.
We bring the three found or created turrets to the shelter on the lower floor, place them in the blue zone in front of the locked round door to the cargo compartment "B". When we are ready, we get the password from Sarah, open the door and kill three phantoms and a weaver.
Cargo compartment B. There are a lot of containers inside; we open or break them open and collect weapons and ammunition.
SAGGIT loading bay. Here we kill a single phantom. Open all containers. Some containers are locked, to open them, look at their number on the case, at the eastern wall we find a control panel, enter the numbers of the containers to open them. In container 3232 we find a dead person, he has 2 neuromods (completion add. "Truth Lover" quests). In this room we look at number "5" on the wall, the treasure map points to it. Let's move on to the next location.
12. Life support
Prey 2 game

Ekaterina contacts us, she offers to restart the reactor in order to reset the lock and open access to other compartments.
There are a couple of phantoms at the entrance. On the right there is a medical compartment (neuromod, blueprint for antirad).
Security terminal. Upstairs in the corridor there are many corpses, one of them we find password for the safe in the security cabin. But you can only get into the booth itself by turning into a small object. We search the corpse nearby in the toilet and find out about the hiding place at the entrance.
The corridor to the left of the entrance is under electric current; it can be removed by covering the panel on the wall with plaster.
Atmosphere Control Center. In this room there are three pairs of fans in the center. You need to temporarily turn off the fans on the top of the computer, stand on them and pull out the interfering pipe.
Filtration control. We turn on air disinfection on the computer. This room contains the book "Conqueror of the Stars. Volume 4" and an audio recording.
Feed control. You can enter through the ventilation hatch, it is at the top above the broken bridge. Inside there is "Protection from fear" chip.
Ground floor. Storage, code. Inside are 3 neuromods, a drawing of a null-wave silencer.
Rescue capsule compartment. In the side room are fire phantoms and round escape capsules. One audio recording in the middle capsule.
We return and take the elevator to the ground floor. The exit door to the power plant is blocked by a technopath.
Water treatment plant. The entrance is blocked, you need to climb up the pipes and plaster, to the bridge with a ventilation hatch. There is a technopath flying inside the locked room, we destroy him. At the non-working door, we go to the computer, press the button, this will turn on the electricity and open the doors.
In this room we look at number "3" on the wall, the treasure map points to it.
On the top floor we can enter the office of the drunkard Price Broadway. We find in the box computer password, through the computer we remove the lock from the cleaning device. The adjacent upper room can only be accessed through a window or the far door with a broken bridge, inside there are 2 neuromods.
We go down to the bottom floor, turn on “Eel Extraction” on the panel, eels, a mimic and Broadway’s body with a neuromod will fall out of the tank.
The technopath has been destroyed, we can go to the next compartment.
13. Power plant
Prey 2017
Objective: Help Ekaterina Ilyushina

At the entrance to the checkpoint, we destroy the monster mines. There is a locked door ahead, it can be opened if you hack the checkpoint computer, or you can go through the ventilation hatch above the bot device.
There is a room with electricity on the side. You need to quickly jump through the door so as not to get electrocuted, fill the broken panel with plaster, and open the adjacent safe door. To walk on electric water, we build paths from gypsum. On the other side we will find an audio recording with a code, a drawing of a K-beam thrower.
In the corridor on the right side there is a locked door, an audio recording and a broken shield with arresters. Here you can bring a whole spare part from the lower floors to turn on the light in a locked room. You can get into the dark room itself a little later through space.
Coolant chamber. We go down the elevator. There are several phantoms and many broken turrets here. There is a spare parts warehouse on the side, which requires a level 3 hacker to crack. There is a locked door ahead, Ekaterina tells you to find the body of the girl Talia Brooks, she has the access code. The required body lies nearby, to the left of the door, we put out the fire with plaster, we search the burnt girl, we find access code Coolant chamber.
In the opened room we find Catherine herself, she is sick and sitting on the floor. She needs to get medicine from her cabin - add. task: Help Ekaterina Ilyushina. She tells us what to do to reboot. There are 3 neuromods nearby. If you have the skill of a hacker, we hack the computer and open the local gateway to space. If not, you will have to go into space through the cargo bay.
Additional task: Catherine's medicine
You have 2 hours to complete the quest, after which the girl will die. We go into space through the nearest airlock. We fly to Catherine’s depressurized cabin, the entrance is guarded by a telepath, and inside in the nightstand we find medicine. We return to the girl and inject her with medicine. She's saved, but she'll be sitting still for a while.

In the power plant we go down the elevator even lower, we go to the reactor along the landings. There is a warehouse on the side, if we can open it, we will find turrets and bots inside. Here's a good place to do it achievements "kill two bots with one lightning".
To get into the control room, you can find passes Passage to the reactor near two corpses (near the broken elevator or on the upper platform in the center), break open the door, or move the hatch on the roof with level 2 force). Inside we read instructions on how to reboot. We lower the left levers from left to right, on the right side vice versa - from right to left. Let's start the procedure.
During restoration, it turns out that there is a breakdown in the reactor, it needs to be replaced diverter. This part is both in the warehouse and near the elevator, and you can repair the old part right on the spot. To open the glass doors, press the button on the right. We destroy the mines inside and replace the part.
The power plant reactor will reboot, and all gateways and all passages between compartments will become available to us.
Two technopaths will burst into the room, they will destroy the stairs, and there will be no way back up them. We destroy the monsters, after which we climb up the broken canopies in the center of the wall. Above, you need to jump onto the blue pipe along the ventilation box, and go along it to the roof of the central building. We move to the other half of the wall and climb up the canopies. At the end you need to jump over a couple of chasms, using planning while falling, so we will get to a whole part of the landings.
We pass by Ekaterina, she will say that she will go to our cabin. Next is a room with tanks, which was filled with explosive gas. We don’t shoot so as not to cause an explosion, but run past the monsters. The stairs to the top are broken, we are building a new one from plaster. In the life support compartment everything is overgrown with “coral”, there are many new typhons around.
14. Shuttle bay
How to pass Prey 2
Objective: Before I give you the key

We return to the arboretum. Now we can take the gravity elevator to the central building above the ceiling - Alex Yu's office. Inside, on the computer, we watch a video message from ourselves. It turns out that Alex is acting according to our plan, and together we were going to find a way to neutralize the Typhons without destroying the station. We take a neurochip from the table that allows us to scan the Typhon coral.
We break the mirror screen, a safe is hidden behind it. If we hack it, we’ll get a pass to Alex Yu’s apartment. We can turn on the bridge on the computer, this will open the way up. There is a functioning evacuation capsule suspended from the ceiling, but the key to it lies in Alex’s apparatus. Let's go there.
Captain's bridge
Add. task: Danielle Shaw
In the compartment with the rescue capsules we find cook Will Mitchell. He cannot fly away, so he commits suicide before our eyes.
Officer's deck. There are a couple of corpses here, you can find them meeting room pass.
Add. task: Shuttle "Advent"
Captain's cabin. On the computer screen we see that one Advent shuttle left the station a long time ago and will arrive on Earth in 5 minutes. If we comply with quarantine, we turn on the shuttle's self-destruction. If we are trying to save everyone, we don’t press anything.
Living compartment
Having entered the compartment, we enter the elevator, this is the only way to the director’s apartment. A phantom wanders in the corridor, after killing him we get a wedding ring, it must be taken to the cargo compartment along add. task "With this ring".
In the room "Alex Yu" there is a book " Conqueror of the stars. Volume 6"The Estonia 101 pass we need is hidden near the bed under the globe.
Add. task: Gustav Leitner
If Dr. Igwe is still alive, he will ask you to pick up the pianist’s neuromod in the living compartment. To open his cabin, turn on the audio recording with music. The task is required to obtain the achievement.
Arboretum

We return to the garden, to Alex’s room under the ceiling. With the obtained pass, we can board the evacuation capsule and fly away without completing the task. We'll get an achievement for this, but this 1 bad ending option, and after it you can continue the game from saving.
We install a neurochip to scan corals. Through any gateway we go out into space, there you need to find 2 nodes in the Typhonian coral. These places are made in recesses, you need to go through a narrow hatch, and inside they are well guarded by weavers, technopaths and telepaths. It is better not to engage in battle, but to quickly fly, scan, and escape from a dangerous place. Having done this, we return to Alex’s office.
Add. task: Gardening tips. From Alex Yu's house we look down to the west, there is a separate gorge where a corpse lies. We examine it, find a drawing, and use it to create Dr. Howard’s Stimulant fertilizer. We pour it into the watering device in the southern part of the location and turn it on. In 10 minutes we will be able to collect the harvest - a superfruit that completely restores health.
Add. task: Gift for your beloved. In the arboretum, near a clearing with a bench, we find a large tree with initials scratched out. Under the tree we move or dispose of the stone, under it there is a pass for Storeroom A2. We go into the tunnel leading to the residential sector, in it opposite the checkpoint we open the door with a pass, inside the storage room there is a romantic atmosphere: flowers on the floor, champagne, 2 neuromods, and a man who has turned into a typhon.
Add. task: Search for Treasures. We go to cabin 109 A.Foy. We hack the computer, select “functions”, enter the found password 1365. We get a drawing of the unique chip “Adventurer’s Arsenal”.
At the arboretum we get to Alex’s computer and try to transfer the scanned data to him, but the process is interrupted by someone. An emissary of the corporation arrived from Earth on a shuttle, he quickly took control of all systems, and relieved us of our directorial positions. He also released combat drones with laser cannons at us, we are preparing for their arrival.
Add. task: Dahl-pursuer
The first thing you need to do is visit the “Data Storage” sector. There, on the top floor, in the security computer, enter the ID number of your beacon bracelet: 0913 . Let's turn it off. This way Dal will not know our location and will not constantly send enemy drones to us.
Shuttle bay
Task: Consultant

You need to get onto Walter Dahl's docked shuttle and deal with it. We get to a new location, find a shuttle, it is guarded by many drones and turrets. Can't get into the shuttle itself yet.
To the right of the entrance, the checkpoint room is locked, to get there, we go around it from behind, we see broken boards under the ceiling, we climb there, crawl through the ventilation. Here on the computer we turn on the elevator, take pass Shuttle control center.
Using the turned on elevator, we can go to the top floor. We examine Mia's office. After this, we jump over the gap and enter the control center under the ceiling. Inside at the bottom of the room, click on the computer, this will extend the bridge to the shuttle. We jump to the center and enter the spaceship.
Walter Dahl himself is no longer inside the shuttle. We examine the computer, download the file, we recognize Dahl’s task in it. He flew in to clear the station of all people. We learn that he gained control over all electronics with the help of a special bot-technician “Caspar”.
Rescue capsule compartment. In the western part we go down to the lower floor to the capsules. We examine several corpses, find an audio message from one of them, we receive add. task "Golden Gun"- we received the access code to the captain’s cabin “102 - J. Marks” in the living compartment, if we go there, we will find a unique golden pistol “Artemis”, it is slightly better than usual in terms of characteristics.
We see that the 2nd capsule is missing, and a girl locked inside gets in touch with us - we get add. task "Escape attempt". You need to go into space and shoot 4 blockers on the airlock from the outside. After this, we return to the capsules, open the panel on the central bridge in front of the window, and select “Launch 2 capsules” on it. This way we will save two people. (If we complete the game while observing quarantine, we need to press the start button immediately without removing the blockers, this will cause the capsule to explode and people will die.
Life support
Add. task: Dahl's Ultimatum

Dahl gets in touch and tells him his plan: he began pumping nitrogen instead of oxygen into the cargo compartment so that all the surviving people would suffocate. Sarah asks for help to solve this problem. You have 15 minutes to complete.
You need to get to the Life Support compartment. The easiest way to do this is from the Arboretum or Hall via the central elevator, if we have previously repaired it. (If we play without using neuromods, first we need to find a drawing of the spare part. Inside the compartment there are two elevators, from the lower platform we look up, there are corpses of workers on the pipes, one of them has drawing "Air purifier". We create one such detail).
On the air purification floor, if we have not yet repaired the fans, we temporarily stop them by pressing the button on the panel and quickly remove the fallen piece of pipe.
We enter the open flow control room, through the glass we see Dahl in the next room. Here on the computer we turn on “air disinfection”, this will cause Dahl to suffocate and lose consciousness. The next locked room can be reached by having a hacker skill of 4, turning into a mug, and jumping through the small side window; or build a plaster ladder over a broken bridge and crawl into the hatch. Inside the room, we lift the panels with resistors and insert them back into the cabinets. One resistor is broken, it needs to be repaired with skill, or a new part needs to be created according to the drawing. The air supply will resume.
We don’t kill Walter Dahl himself, only he can drive the shuttle, and we need him for a successful evacuation. Dahl's stunned body can be taken with you; it must be taken to the "Neuromod Department", where on the top floor you can erase a person's memory.
Add. Objective: Incapacitate Dahl
If Dr. Igwe is still alive, after Dahl arrives, he will propose a rescue plan. We come to the doctor in our room in the Hall and listen to him.
We don’t kill Walter Dahl himself, only he can drive the shuttle, and we need him for a successful evacuation. His stunned body will be taken by Dr. Igwe and transferred to the “Neuromod Department”, where on the top floor a person’s memory can be erased when neuromods are removed.
We get to the top floor of the Neuromod Department, the doctor is already there behind the round glass. Press the buttons on the computer panel to begin the operation. Dahl will forget everything, and the doctor will convince him to return to the shuttle and prepare for evacuation.
Add. Objective: Help Luther Glass
If, after Dahl appears, we enter the Hall, Luther Glass will contact us and ask us to save him. We go to the emergency room on the second floor, inside there is an ambush of several combat drones. Luther Glass himself initially lay dead on the center couch. Robots deceived us by imitating the voice of an already dead person.
The entire Talos 1 station
Task: Consultant. Search for Technician Kaspar
Caspar can appear at any random point on the space station. The game itself only indicates the compartment where it is located.
If it is in the casing of Talos-1, we go out into space through the airlock, look for the bot, fly to the Arboretum airlock, find the Kaspar robot from its back side, and destroy it.
If in the neuromods department, we look on the site with the helicopter, in the corners.
If in the hardware laboratory, we inspect the upper floors.
15. Endings
How to pass Prey 2
(If you haven’t completed any additional quests yet, now is the time to do it. After meeting Alex, many new obstacles will appear at the station that will prevent you from completing side quests).
Objective: Keys to Heaven

When the technician Kaspar is destroyed, Alex will contact us, he agrees to give the key. In the Arboretum we rise into a dwelling under the ceiling. On the left outer side we find the door to the secret room. Alex Yu gives us a drawing of a null-wave silencer that can destroy all Typhons. Only after this does he hand over the key.
Suddenly, a giant Typhon, the size of the station itself, flies towards Talos-1. It extends its tentacles into most of the compartments. Due to the invasion of Typhon, the entire section of the Arboretum is depressurized. Alex does not have a spacesuit and loses consciousness. If we want to save his life, we grab him and drag him back to the secret room, search all his things. We can also kill Alex, they will pay for it achievement "Push the Fat Man", but this leads to a bad ending.
We get two final quests: enable the station’s self-destruction or enable the destruction of the Typhons. We can fulfill the conditions of both quests, and at the end, on the captain’s bridge, decide which system to activate.
Objective: Death– 2nd ending option
Alex Yu gave us a drawing of the key, but it is not necessary to make it; in his secret room we find a ready-made key. With two activator keys we go down into the power plant reactor. We find a hatch in the floor, insert and turn both keys in the room under the reactor.
From the reactor you will have to repeat the climb up along the broken canopies and pipes. We get to the arboretum compartment, from there we go down the right elevator to the captain's bridge.
The technician “December” is waiting for us on the top floor of the bridge; he has already prepared everything. All we have to do is click the “Perform auto-destruct” button. The timer starts for 8 minutes. We can sit in the captain's chair to quickly wait for the end of time. At the end, the entire space station will explode along with the giant monster.
Objective: Incapacitate Dahl– 3rd ending option
If we carried out an operation on Dahl, then he will call us immediately after activating the station’s self-destruction. In the remaining 8 minutes we need to go through the following path: Captain's Bridge - Arboretum - Hall - Shuttle Bay. All other surviving people from the station will also get there. Inside the shuttle, Dahl is sitting at the wheel, in the intermediate room there are important characters: Igwe, Ekaterina, Sarah, Danielle; the rest of the people are on the lower floor, where they cannot go, but the number of people saved is visible on the screen. (In the shuttle itself, it is no longer possible to kill people; if we complete the game, observing quarantine, then we had to kill all the survivors before turning on self-destruction. If only we and Dahl survive, we will receive the secret achievement “Awkward silence on the way home”). We take off on the shuttle, the space station explodes.
Challenge: Mind Without Borders– 4 ending options
Create a prototype of a zero-wave device. Any fabricator in any compartment will do this.
With the device we go to the “Psychotronics Laboratory” compartment through the hall. We find the central capsule with the first satellite, from where the golden threads of “coral” began to spread. From the north side we go inside the capsule, fly to the Soviet satellite, and place a zero-wave device on it.
We return to the arboretum and go down to the captain's bridge. On the lower floor we approach the computer. It is not possible to press the power button due to interference. We go up to the top floor, there is a technician “December”, we destroy him and the interference will disappear. Click the "Activate device" button. All the golden threads and all types of typhons, including the giant monster, will immediately burn and turn into ashes. The remaining people were saved.
Hidden location

After the credits we find ourselves in a new place. We sit chained, and in front of us is Alex Yu and four technicians. It turns out that all previous events were only virtual reality. The entire earth has already been captured by the Typhon network. And we are a special typhon that Alex experimented on. He introduced us to human neuromods and forced us to experience the human life of Morgan Yu. Now we face a trial: a tally of all our actions in the simulation. There were 4 technicians as judges who played the role of characters, each with three conditions for obtaining a positive result:
1. Dr. Igwe: 1) Help the doctor in the container. 2) Find a pianist neuromod for him. 3) Do not use Typhon neuromods. 4) Stun and not kill Dahl.
2. Ekaterina Ilyushina: 1) Help bring medicine. 2) Help find a record about my father and tell the truth. 3) Release the test subject from the cage.
3. Sarah Elazar: 1) Help the survivors with defense. 2) Kill enough Typhons. 3) Save the surviving people from suffocation.
4. Danielle Shaw: 1) Find Danielle outside the pool window. 2) See the death of the pretend cook in the escape capsule. 3) Save at least 10 zombified people by killing telepathic typhons.
If we played aggressively and more than half of the conditions were failed, then we would simply be put to sleep. If more than half of the conditions are met, then Alex will try to negotiate with us, and we will have a choice:
Kill everyone - after shaking hands, we kill Alex and stun the technicians.
Take Alex's hand and the typhon will turn into a human.
|
Achievement "Honorary Reader Site" Did you like the article? In gratitude, you can like it through any social network. For you this is one click, for us it is another step up in the ranking of gaming sites. |
|
|
Achievement "Honorary Sponsor Site" For those who are especially generous, there is the opportunity to transfer money to the site’s account. In this case, you can influence the choice of a new topic for an article or walkthrough. money.yandex.ru/to/410011922382680 |
At the very beginning, we choose the main character, man or woman. After you wake up, put on the uniform hanging on the door. You can look around, read magazines and notes, look at messages on the computer. In the future, all viewed messages can be viewed in the menu. When you're ready, leave the room, take the elevator up to the roof, and board the helicopter.
Having arrived at the place, go inside the building and talk to the robot if you wish. After that, take the elevator down. Approach your brother Alex. After a short conversation with him, go to the test chamber.
Approach the glass wall where several scientists are standing. After a short instruction, press the red button, and then move the boxes that appear outside the circle. Go to the next room. You can hide behind a chair, or you can do nothing - you will still fail the test. Next room - press the button, jump over the obstacle and press another button. Next is the last room. Sit down at the table and start the psychological test. Answer the questions as you wish, then watch a short cut-scene.
Run
Waking up again, we look around the room again, read everything we come across, and also look at the messages on the computer. We select all the items, search the drawers, and then put on our uniform and leave the room. We select the adjustable wrench from the corpse on the left, and then the mysterious “January” will contact us.

We go back into the room and break the window using an adjustable wrench. Study all the computers and notes that you come across.
Go right, going around your room. In the room with the experiment chair, on the cabinet there will be a suitcase with a Stunner shocker, which is extremely effective against robots, as well as a Kinesthetic Assistant chip. We pass through the door with a burning orange light, then into the room with the helicopter. From there - into the corridor where we met with Alex. Through the now open reception. In the second side room there will be two chairs - one of them is a mimic, the same as the one that attacked the scientist at the end of the test. These little mischief makers disguise themselves as various objects that are nearby. You see two cups next to each other - one is most likely a mimic. A trash can rolled - again most likely it was a mimic. And so with every item.

We go up the stairs and go straight through the disinfection chamber. We watch how the mimic deals with the scientist, after which the alien multiplies. When they run away, the doors will open. In the next room, on the nearest computer on the left, read the message “Urgent!”, after which you will receive the additional task “Vanishing Corpse”.
Before us is a closed door to which we need a pass. Here you can do things differently. Firstly, you can use the ventilation shaft hatch on the right in the far corner. Secondly, on the right there will be Bellamy's office, in which there will be a key card to the simulation laboratory on the table. Beware of the mimics that are hidden among the objects around you.

Having passed into the next corridor, we will see a more formidable enemy - a phantom, although you don’t have to be afraid of him for now, he will not leave the confines of that room. We go along the corridor and pick up the GIPS gun. We also collect ammunition for it from the corpse. Using it, you can make improvised stairs along the wall, seal holes in pipes, etc. It will also help in battle - with its help you can immobilize opponents for a short time and make them more susceptible to damage. There will be several mimics in the lobby. Try out the new gun on them. After this, “January” will offer to take the neuromod from the display case, the additional task “Everything is about to change.” We take it, pump it up, look around, and then go into the hall. We go down the stairs, after which “January” contacts us again and offers to go to your office.

Office with a great view
Facing the elevator, there will be a "Transtar Exhibition" on the right. There you can take the neuromod from the pedestal, but there is a phantom walking around there. In the early stages, the easiest way to deal with him is in 2 stages: first neutralize him using a gypsum gun, and then strike him with an adjustable wrench if you haven’t found a pistol or shotgun yet.

We go up to the third floor along the stairs nearby. We approach our office and enter code 0451 on the panel to unlock the doors. Inside, pick up everything you see. On the table near the operator distributor there will be a pass to Morgan's apartment and a pistol. There will also be a fabricator and a recycler on the premises. The recycler is used to process any items into materials, from which then, at the fabricator, if you have the necessary drawing, it will be possible to make weapons, first aid kits, cartridges and much more, which is extremely necessary for the passage.

After looking around, go to the computer. Take the pass to the teleconferencing center from the table and read the note attached to the monitor. Enter the password, read the messages and turn on the video “Watch me, Morgan” in the “Features” menu. We turn around and watch the video. In the video you can see the code - 5150. This combination is suitable for a safe from the Neuromods department.
Through a glass darkly
You will not be allowed to watch the video until the end. After first your brother Alex and then January contact you, we go back out. There will be two side rooms in front of the stairs. On the far table there will be a pass to the emergency room (you can also pick up a pass to the emergency room on the ground floor at the counter behind the elevators). We go to the teleconference center, located at the other end of the landing. Keep the gypsum gun ready, because... Several mimics will attack you at once. Immobilize them and then finish them off with an adjustable wrench. Just outside the door will be the corpse of Elias Black. Take the pistol and shotgun ammo from his body, as well as the blueprint for the 9mm ammo needed for the pistol. The pistol itself lies nearby.
You can go down to the emergency room. It is located one floor below. There will be two phantoms inside - normal and fire. Try to shoot the cylinders to cause maximum damage. It’s worth moving quickly and not standing still, because... a new type of Typhon creates a pillar of fire directly under the hero. In the lobby of the emergency room, you can download a map of the sector from a computer, and also view mail. The latter will continue the quest “The Vanishing Corpse”. Also inspect the entire medical bay. There is an operator distributor here, where you can call a medical operator who can always cure you, essentially an endless first aid kit, but tied to a specific area. In one of the rooms there will be a living person, Trevor J. Young, under mind control. For now, you won’t be able to disarm him without killing him, so if you want to get the “Do No Harm” achievement, wait until you have a special grenade - the null-wave silencer.

On the ground floor near the stairs there will be a security office. You can get inside through a pipe, which you should jump onto at the beginning of the corridor, and then jump from it into the ventilation shaft. Inside you can find a shotgun and ammunition for it. There is also a note with the code for the interrogation room - 1129. In the safe there is a drawing of cartridges for a 12-gauge shotgun, code 0526, it can be found here, in Sarah Elazar's office, in the book Orit. Also take the note from the table - this will begin the quest “Stolen Neuromods”.
If you go through the teleconference center and then across the bridge to the other side of the hall, you can get to the sales department, where the Huntress dart launcher will be lying on the floor. You can also find a box with four neuromods here - once you find it, complete the “Stolen Neuromods” quest.

On the second floor, from the landing you can walk along a narrow ledge to the staff rest room. Behind the bar will be the body of Octavia Figgs. After listening to her transcript, you will find out the code for the door to the pre-flight preparation room - 3884.
When you finish exploring the hall, go up to the third floor along the same stairs that you used to go up to your office, go through the teleconferencing center and turn left, after which you go to a new location - the hardware laboratory. To do this, you will have to use an adjustable wrench to clear your way from the hardened foam.
Inside there will be a new enemy - an infected operator. You can use the Stunner shocker for it. It knocks out a robotic enemy for a while and also deals significant damage to it. After stunning, you can finish it off with an adjustable wrench, but it is worth considering that when it is destroyed, it explodes, causing damage. Going a little further, in the corridor on the left you can take a neuromod. There will also be another infected operator and a mimic, and at the end of the corridor there will be a hall where, through glass, you can watch a scene about the unequal struggle between a scientist and a phantom. Take the staff entrance pass from Sean Larsen's body. Then you can jump down, especially if you want to go secretly, and climb into the ventilation. You can go back and go to the security point, where you can take cartridges, weapons, and also a drawing of cartridges for a pistol.

You can get to the next room with elevators to the second floor either through the front door near the security point, or through the ventilation, which was written about earlier. There will be a phantom inside. On the ground floor in the side corridor you can find the corpse of Aimee Schmidt, from which you can pick up a pass to the ballistics laboratory and a disposal grenade. It can be used to destroy Typhons, as well as clear the way for yourself by processing large boxes into materials. The ballistics laboratory itself will be nearby. You can find a variety of materials inside. The code for the safe is 8028 - you can read it in a note lying on the floor behind the bars.

In the southern part of the room, near Dr. Calvino’s workshop, you can get into a demonstration scene, the same room where you could watch the murder of a scientist by a phantom a little earlier. The phantom itself will be one level lower. There you can also find a recycler and a Huntress dart launcher. In the central room on the floor there is a chip with protection from ethereal damage.
We approach the workshop of Dr. Calvino. After January contacts you again, we return to the security point and place a marker on Lorenzo Calvino in the hardware laboratory. We go up to the second floor using the elevator in the next room. If you go into the corridor on the left, you will be attacked by a phantom and several mimics. There will be a terminal near the porthole. The password is on a note on the floor nearby. The second letter will contain the code for the mechanical shop storage room - 9501. Next you can get to Torstein’s office. The safe code is 9954.

On the second floor, in one of the side corridors, there is a marker about Lorenzo's body. If you go there, you will find out that you can only get to it from outside the station, and for this you will have to do “Artax”. We go into the next room - the machine shop. You can do this through the main entrance, but you will have to repair the electrical installation so that you do not get electrocuted, or use a gypsum gun to stop the shield from sparking for a few seconds. You can also go around the side for ventilation. We kill several infected operators and mimics. To get to the blueprint and fabricator, climb up the bales on the side. After you've done everything, open the gateway and go out into outer space. Fly to the marker, search the body of Lorenzo Calvino, take the pass and transcript and return back. Go to Dr. Calvino's workshop. In the far corner of the room we turn on the power supply. On the terminal in the center we check the network utilities, and then look at the recording. Please note that on different screens the videos are from different angles. This way you can gain access to the doctor's secret safe. The thermos is lying on the floor near the large screen on the right in the nook, if you are facing the terminal. Place it on the scale and a panel will open next to it.

Go back to your cabin. The hall will once again be populated by Mimics and Phantoms, so be careful. Let's watch the video.
Talk to "January"
One of the shortest and easiest missions in the game - just talk to the operator.
Sharing Pass
After the conversation, “January” will give you a pass and a neuromod - take them from the table.
Data store
Go down to the main elevator and try to start it. When all else fails, “January” will contact you and give you the next main task, “A Workaround.”
Who are you, “December”?

Go to the door to the psychotronics laboratory. On the way, another operator will contact you and introduce himself as “December”. Follow the neuromod department, there in the foyer you will see a small scene, after which you will search the remains of the operator. You can continue the main plot or look around and climb to the second floor. There you can search the cabins of volunteers and production. In any case, you will have to return to the last room in the future to remove the copy protection (the additional task that you will receive if you do not do this now will be called “Copy Protection”) so that you can create unlimited neuromods on the fabricator number of times. We need Holden Graves' office. You'll have to sweat a little, because... It will be guarded by a rather strong enemy - a Technopath. The most effective against him is the Stunner, but only at close range, or disposal grenades. Below there will be a corpse with a pass to the desired office. Use a computer. When you're done with everything, return to the main task.

Workaround
Go forward along the only path. There will be a security point on the right. You can get inside either using a dart thrower (break the glass and then shoot the button), or you can simply crack the combination lock. At the terminal inside you can download a location map.
Go to the showers. There will be a hole in the floor. We jump into it and at the end of the tunnel we take the psychoscope from the scientist’s body. It will allow you to scan typhons and gain their abilities. Scan the immobilized mimic nearby, then head back to the showers. Go further and take the elevator up. Scan the opened capsule to calibrate the psychoscope.

You will receive the additional task "Dr. Kelstrup's Neuromods." It is recommended for passing, because... receive the neuromod blueprint. Just go into the side room and search everything there. The safe will contain the treasured drawing. At the terminal you can watch a video about typhons, and pick up key cards from the doctor’s body. If you create many mods, the lock will turn on and the “Copy Protection” task will appear if you have not removed it earlier. If you haven't done this, you'll have to return to the neuromod department. The walkthrough for this quest can be found above in the mission “Who are you, “December”?”
When you're ready to continue, approach the large round door. If the psychoscope is calibrated, then you will be allowed to continue.

There will be a staircase on the right that takes you to the second floor. At the far end there will be a gateway, which is better to open, and on the opposite side you can find a transcriptor near the girl’s body on a chair and receive the additional task “Truth Lover”. When you're done here, go back down the stairs and scan the Weaver behind the large glass. There's a fork here.
You can go left. In this case, you will have to plaster the holes in the pipes to stop the fiery jets, and there will also be several mimics there. Having passed further, you will find yourself near a glass chamber with an experimental subject and will receive a new task: “Prisoner in the psychotronics laboratory.” Here you will have the first choice that affects the ending: you can free the prisoner by opening the cell door, or kill him by sending mimics towards him. All this is done at the terminal near the camera. If you release the prisoner, he will tell you the code to the door to the next room. Among other things, there will be drawings of 12-gauge shotgun and pistol cartridges with a silencer.

Also in the large room with the camera there will be a corpse of a woman with a psychoscope. There will be a transcriptionist nearby, after listening to which you will be given the task “Million Dollar Sealant”. To complete it, you need to go into outer space, since the airlock is nearby, and use a gypsum gun to seal the gap in the hull. After that, go back to the place where you found Christine Lloyd's transcript and kill the phantom in the room next to her corpse. Here you can find a lot of exotic matter. Having finished on this side, we return and pass by the large glass, behind which the Weaver is visible. We find ourselves in the observation room. On the right you can take the elevator down to the morgue. This is where you can continue the quest “The Vanishing Corpse”. You cannot get into the desired room without a pass, but you can break the window and shoot the button that unlocks the door with the Huntress dart launcher.

Take the pass from Sylvain Bellamy's corpse. Further progress on this additional task can be continued later, when access to the residential section becomes available. When you're ready, go to the terminal next to the large glass chamber and follow the suggested steps in the "Observation Department Management" section one by one. Kill the phantom that appears, and then proceed to the new location “Saggit”. You can go straight through the gateway, or before that you can go down the stairs and look around. There will be a long tunnel in front of us. Fly forward, avoiding the cystoids and their nests. The path forward will be blocked several times by locked gateways and other obstacles. To advance further, either pick the lock, or repair the electrical panel where necessary, or find ventilation. If the fan will work, fix it with a plaster gun. Fly until you reach a gateway that requires a pass. There will be a branch nearby. You will recognize him immediately, because... it will be with the field of gravity change. Follow there. Look around and listen to the transcript. Beware of energy surges. Every time he approaches, you will be warned - hide behind the cabinets. In the far corner, read the letters on the terminal and receive the task “Project Blackbox”. Mark Josh Dalton's location here on the terminal and download the location map. Climb to the second floor and climb into a field with zero gravity. Take the service tunnel pass from the scientist's body and return back to the locked airlock. When you reach the fork, follow the markers: the Arboretum in one direction, the body of Josh Dalton from the quest “Project Blackbox” in the other. First, let's complete an additional task. Fly towards the marker and you will see a large metal round pipe running along the wall. The body is behind her. To get into this pocket, fly along the bottom of this pipe and near the bend there will be enough room to fly under the pipe. Take the pass to the Blackbox laboratory from the body, and also find a K-beam gun nearby - a rather powerful weapon. Now you can continue the main task.

Fly towards the marker in the Arboretum. On the way you will have to encounter the Weaver. The K-beam gun will be extremely effective against him. We make our way through the gateway, and then move to a new location. Ahead there will be a corpse with a transcriptor. Listen to it to receive the "Disgruntled Employee" quest. Climb the stairs and then climb into the ventilation. Here you will be given another task - “Problems with the elevator.”
To complete it, go to a new location and deal with the Technopath there. Use Stunner and EM charges to cause damage and disable him for a while. Once you clear the area, elevator travel will become available. Using it you can quickly move between the hall, life support and arboretum. Here, search Devris's corpse and take the key card. Listen to the transcript located nearby and receive the task “Do no harm!” To complete it, you will have to go down to the hall and go to the emergency room. In Devries's office, read the letters on the terminal and download the encryption key. Listen to the audio recording “Morgan: Hysterical” through your inventory. The code for the safe in the office can be found in the back room of the emergency room, behind the glass, - 7324. Next, we go to Dr. Kohl’s office nearby and run the test on the computer. Use the suggested answers: A, C, B, A, C. A safe will open nearby. Listen to the transcript lying there and complete the task.
When you're done, head back to the arboretum. Here you can take on a few more side quests:

"Save Rani." It is taken in a greenhouse - the building is located on a hill above the entrance to the residential section. However, don't rush to go there. To begin, walk along the narrow path that starts near the entrance to the residential section and leads to the gazebo. Read the note from the ground and get the code. Go to the greenhouse. Be careful here. There will be a dangerous enemy here - the Telepath. He subjugates people and directs them towards you. Once nearby, their heads explode, causing significant damage. A null-wave silencer or Stunner will help neutralize them. Open the greenhouse on the control panel using the received code. Do not approach people, fire a couple of shots from a shotgun at the Telepath, after which he will leave the greenhouse, and you can calmly deal with him without exposing people. Remember that Rani must survive for you to receive this task. The second option is not to open the door and climb onto the roof, from where you can start shooting at the Telepath. When he dies, talk to Rani. She will give the warehouse code AR01. Go to the warehouse and complete the task.

"Golden Gun" Create a staircase using the gypsum cannon on the rocks on which Alex's office is located. Climb up it and climb into the space under your brother's house. There will be the corpse of Marietta Kirkas. Deal with the electrical panel, and then take the pass from her body and the transcript, which is worth listening to. Next, the quest will continue in the residential section.

"Gardening Tips." Next to the body of Marietta Kirkas, whom we just visited, there is a small elevation of stones. Climb onto them, and then jump into a kind of crater. Julien Howard's body will be there. Listen to its transcript and create the necessary device at the fabricator. After that, go to the watering system next to the greenhouse. Place the device in the slot and press the button. Now you have to wait 10 real minutes for Dr. Howard's Superfruit to grow. Take it to complete the task. You can grow an infinite number of times, the main disadvantage is the long wait. At the same time, the fruit perfectly heals wounds.
Let's return to the main task - “Workaround”. Go towards the marker and take the elevator down. Listen to the transcript of Zachary West - his corpse will be right in front of the entrance to the data warehouse. Receive a new main quest - "Collecting Voices", and the "Detour" will be completed. Don’t forget to take a pass and a note, which, when checked, turns out to be a treasure map for the “Treasure Hunt” quest. Now our path lies in the residential section, but it’s worth taking a look at Alex’s office.
Who are you, “December”? (Part 2 - Arboretum)

Go up to Alex's office in the arboretum. The elevators don't work, so build a staircase along the edge of the hill using a gypsum cannon. Go inside and move the box blocking the entrance to the hatch located near the table. You will need the Climb II ability. Get inside and unlock the safe. Code - 2512. Take the key card to Alex Yu's apartment. Continuation of the quest - in the residential section.
Collecting votes
Head to the residential section. Here you will immediately be greeted by Nightmare and many people controlled by a telepath. Before Nightmare reacts, we immediately throw a null-wave silencer at the nearest people if we want to save their lives. If you kill at least one of them, you will not receive the “Do No Harm” achievement (if people explode themselves near you, then this will not be considered a murder). They can be temporarily immobilized with a GIPS gun, but if you pass nearby, they will still explode. There are two options with Nightmare: you can run away and sit out for a little over 2 minutes in a secluded place, or kill him. For the second option, a K-beam thrower is ideal, and for the first, a room with a waste disposal unit on the second floor (the door on the left as soon as you go up the stairs located to the left of the entrance to the residential section). There will be one phantom. From his corpse you can take a pass - Restricted Drugs. Also in this room there will be a piece of paper attached to the table with the code for the elevators to the directors' apartments - 3302.

“Kok’s Request” - you will receive this side quest automatically as soon as you find yourself in the residential section. The cafeteria is located on the first floor in the far corridor on the right, if you stand with your back to the entrance to the location. The path will be blocked by many infected people. Use a null-wave silencer or a Stunner shocker (the latter is only effective at short range). Use the K-beam gun against the telepath. Once he dies, all the people he controls will lose consciousness. After this, go to the kitchen and talk to cook Will Mitchell. Take the pass and head to his cabin. Inside, listen to the transcript after completing the “Collecting Voices” part of the task, and also grab the medal from the nightstand near the bed. Return back to Mitchell and give him his reward. Go to his kitchen. The cook will complain that the water pressure regulator is broken. You can do it in two ways: you can repair the one lying nearby, or you can return to the arboretum and pick up a working device from the greenhouse. When you fix it, the cook will let you into the freezer. When you wake up, go to the back room. Abigail Foy's body will be there. Listen to her transcript. This will advance you in the main task, giving you the necessary voice sample, and also receive a new task - “Daniella Shaw”. Move the block of ice if you have the appropriate skill, or shoot the pipe on the left to melt the ice. After that, open the hatch and climb into the ventilation. The "Cook's Request" quest will be completed. Don’t rush to leave the kitchen—Mitchell left a mine on the door. Shoot the button that opens the door with a dart launcher to disarm the trap.

“Truth Lover” - part of this additional task is completed in the residential section. Follow the marker and search the girl's corpse. Listen to her transcript. After this, head to the security point on the first floor of the residential section and listen to the recording and read the report. Continuation of the quest - in the cargo compartment.
"The Vanishing Corpse" - go into Bellamy's room and search it, and the quest will complete.
“Golden Gun” - go to the desired cabin and open the safe (code 3479).
Let's continue with the main task. Visit Danielle Shaw's cabin and listen to the transcript lying there. You can also take on an additional task on the computer - “Treasure Hunt”. Another transcript will be in the cinema on the second floor under the seats. Another part of the voice can be obtained in the bar, also located on the second floor. In the far corner, climb into the ventilation and turn on the power supply. Near the stage there will be a small room with a terminal. Listen to the recordings. The next sample will be in the recreation center on a table on the second floor. You can also use it to get a pass to Abigail Foy’s cabin. Listen to the recording there on your computer and get 100% voice samples.

Having collected all the voice samples, or even if you haven’t collected them and you are too lazy to continue, you can begin the side task “Daniella Shaw”. Go to the fitness center (door code 5078). Be careful - there are a lot of people subordinate to the telepath there. The telepath himself is in a distant large room - a swimming pool. Kill him, then go to the window in the far corner and knock on it. Daniella Shaw will appear and give out a voice sample herself, and will also offer to deal with the cook. You need to look for it in the arboretum.
In this location you can take on another side quest. In the crew quarters on one of the upper beds, listen to Lawrence Baxter's transcript. This way you will receive the task “Gift for your beloved”. To complete it, you will need to return to the arboretum.
Who are you, “December”? (part 3 – Residential section)
Enter the password for the elevator (can be found on the second floor in the room with the disposal - 3302). The required pass will be under the globe on the nightstand. Just hit it with an adjustable wrench. Then you can leave the station using the rescue capsule, returning to the arboretum, but the game will not appreciate this and will offer to continue playing.

Restore from backup
We return to the arboretum. Here you can complete two side quests along the way:
“Daniella Shaw” - we go to the bridge of “Talos 1”. Our pretender will be sitting in the far capsule on the left. As soon as you enter the capsule, run away immediately, because... another of his devices will work. After this, the task will complete.

"Gift to my beloved." If you stand with your back to the waterfall, there will be a thick tree on the left. Move the stone near it. Take the pass from storage room A2. Kill the phantom inside and pick up valuable items.

Now you can return to the main task - “Restore from backup”. Let's go to the data warehouse. Unlock it using Shaw's voice password. Go forward and kill the technopath.
On the side there will be stairs to the second floor. There, on the terminal, you can continue the quest “Disgruntled Employee” by entering his number – 1129. After that, on the security service terminal, mark his location. It is located outside the station, so you will have to fly in outer space.
Upstairs, take the security pass to get into the room on the first floor. There, at the terminal, unlock the door to the archive. Follow the room with zero gravity. Fly down to the hard drive. Along the way you will come across many nests of cystoids, and the Weaver will also be waiting below. Take your backup hard drive and connect it to the server above. On the terminal, click “Connect disk” and go back. Go back up to the second floor to the room with the recycler and fabricator. On your computer, download the file “Activation_Key_U_M”. After this, you will be given the next task, “Keys to Paradise.” It leads to one of the possible endings. Since it’s easy to get one key, you can simply create it at any fabricator, and the second can only be obtained in life support, and this can only be done much later in the story, let’s return to the “Restore from Backup” quest.

On Danielle Shaw's nearby computer, access data module B, then go to the opposite part of the location on the second floor. You will need to move the closet. If you don't have the required skill, use a disposal grenade. Having dealt with the weaver and the phantom, follow the desired corridor. Open the hatch and press the button, after which you will find yourself in a capsule in outer space.
When you wake up, press the button and fly to the cargo compartment. As you approach it, Dr. Igwe will contact you and the quest of the same name will begin. Remember - you only have 7 minutes to save him. If you don’t have time or simply open his container, he will die, and this will affect the ending. Fly to his capsule and remember its number. After this, fly to the cargo compartment and at the terminal enter the number of the desired container - 2312. The container with Igwe will start moving and dock with the station. After that, through the same container, get inside the station.

Reception and dispatch
Go through the central doors (over the bridge) into the room with the survivors. Go up to the second floor and talk to Dr. Igwe, completing his quest, and then talk to Sarah Elazar. She will issue the task “Defense the cargo compartment”. It also affects the ending. To find the turret blueprint, you should go outside again and find the required safe through the hole. The code is 7527. To supply power to the fabricator, you need to walk along a long corridor covered in blue fire. This can be done from the top, moving along the racks and pipes. Click on the button on the switchboard and then exit through the door. You need to install at least three turrets in front of the door to compartment B (the area is highlighted with dark gray metal), it doesn’t matter how you get them. You can create them at a fabricator, or you can bring in ready-made ones. One will be right on the bridge, another in container number 05. To get to it, take the freight elevator at the terminal opposite. The third turret is with the survivors in the warehouse on the first floor. To open the door, either hack the terminal, or get the note from Gus Magill's body. After installing three turrets (more is better), Sarah Elazar will offer to open the door and provide a code. After you open it, a large number of different typhons will climb out of there. After you deal with them, the “Reception and Dispatch” task will be completed.

Follow the room with containers. You can search them, or you can go further into the loading bay of SAGITTA. There will be a container ahead. Pick the lock and take Annalize Gallegos' flash drive from the corpse. Thus, you will complete the quest “Lover of Truth.” Next, go to a new location - Life Support.
Ekaterina Ilyushina will contact you. To begin, go up one floor using the stairs on the right. Search the corpses. Erica Teague will have the password for the safe in the security booth - 9193. There will also be a passage barricaded with plaster. Break the obstacle and read the note from Elton Weber's corpse. It will talk about the cache. We go back down and walk past the faulty electrical panel (you need to either temporarily neutralize it using a gypsum gun or repair it). Using the elevator we go down to the floor below. There is a passage to the escape capsules. Where it bends, jump down under the bridge. There will be a cache there. One of the capsules will contain the Corpse of Emily Carter. Listen to her transcript to get another side quest, “Sobering Up.” To complete it, you need to go to the water treatment plant in the same location (the “Lifting III” skill is required). You need to restore the power supply (the control panel is to the right of the entrance) and go down the elevator at the far end of the room. There, use the terminal to open the hatch and complete the task.

It will also be useful in the future, before sending to the power plant, to look into the atmosphere control center at a higher level. Deal with the enemies and go around the entire structure from behind. At the terminal, stop the fans, jump down and remove the beam that is preventing the proper operation of one of the fans, then quickly leave the danger zone before the fans start working again. This can be done later, but at the same time it will save a lot of time in the future.

When you're done, go to the power plant. There will be a locked door ahead. Hack the security terminal in the room in the middle of the corridor or use the gypsum cannon to build a ladder to the ventilation shaft in the far corner of the corridor above the operators' station. Go forward and take the elevator down. You will find yourself in a chamber with coolant. Deal with your enemies. The airlock is locked. The required key card will be immediately to the left. Use the gypsum cannon to put out the fire and take the pass. Go further and talk to Ekaterina Ilyushina. Whether you help her or not will affect the ending. You can go straight for the medicine into outer space through the cargo bay, or you can first restart the reactor and exit through the airlock here. You have 2 real hours to do everything about everything.

Go down to the reactor, first by elevator, then by stairs. The easiest way to get inside the control room is through the roof (requires Climb II). You can also pick the lock (level 4). On the terminal, click on "Emergency Switches". Next, read what is written on the tablet next to you. The correct order for changing the position of the opened levers will be given there: first three on the left, one by one, starting from the one farthest from the terminal, and then three on the right in the same way. After this, start the restart procedure on your computer. When a breakdown occurs, leave the room and enter the reactor through the glass doors. Walk around and you will see a broken diverter. Now there are two options: a longer one - to pick up a working spare part from the elevator, which can be found out from the transcript lying around here (you can get to the elevator by stairs), or to repair the existing part (3rd level of repair). Install a working diverter, return to the control room and continue restarting. Return to Ekaterina Ilyushina.

Now you can complete her quest “Help Ekaterina Ilyushina.” Unlock the airlock and go into outer space. Follow the marker, find the desired hole in the station's casing and take the medicine from the cabinet. Return to Catherine and inject it into her.
Keys to Paradise
Return to the hall. You will need to go through the coolant chamber again, but this time the room is shrouded in gray fog. One shot and it's game over. Go either through stealth or using a gypsum gun. You can immediately get into the hall through life support - an elevator on the upper level of the location. You will also receive a new additional task “Ekaterina Ilyushina”. To complete it, simply return to your office, where Dr. Igwe and Catherine will be waiting for you. Talk to them and receive a new task - “Catherine’s Father”.
To complete it, you will have to run to the data storage through the arboretum. While passing there, you will additionally receive a quest from Dr. Igwe - “Gustav Leitner”. Once in the vault, follow the marker. The required door is locked. There are two ways: crack the 4th level lock or build a ladder from a gypsum gun to climb onto the blue wires, and from there another one to crawl into the hatch. Once you get to the computer, you will have a choice - erase the recording or move it to the computer in your office and then return to Catherine and listen to the recording. If the entry does not appear on your computer, then talk to Ekaterina several times, and then check again. In both cases, the task will be completed, but the decision you make will affect the ending.

"Gustav Leitner" - through the arboretum, get to the residential section and go to Igwe's room. There, near the painting, play the suggested recording through your inventory and take it with Connectome. Give it to Igwe in your office to complete the quest.
It is better to complete both of these tasks before visiting Alex's office, because... After this, life will become seriously more difficult. Before this, it is better to stock up on ammunition, especially shocker charges, as well as EM grenades. When you're ready and have completed all the side quests you wanted, head to Alex's office in the arboretum. Now you will already have the code for the elevator - 1696.
Before I give you the key
Enter the password on Alex's computer and watch the video. Take the chip from the table and install it. Go out into outer space and scan two Coral nodes, then return to Alex’s office in the arboretum. You won't be able to finish what you started. Two combat operators will appear.
Consultant
To begin with, it is better to complete the additional task “Dal the Pursuer”. Run to the data storage and deactivate your beacon bracelet in the room on the second floor. You need to enter the code on the terminal - 0913. Luther Glass will contact you there and give you an additional task “Help Luther Glass. To complete it, you will have to return to the emergency room. It's actually a trap, and Luther is long dead. We will have to survive the attack of a huge number of combat operators. After this, the task will be completed.
In the hall you can also talk to Dr. Igwe about his task “Incapacitate Dahl.” This task is required if you want to leave the station. Follow the shuttle bay - a door on the first floor of the hall. On the left there will be a corridor through which you can get to the pre-flight preparation room, code - 5593. The only thing is that the road is blocked by a large cabinet - either move it, or use a disposal grenade. Here, from the table, take the pass from the shuttle control point - located on the right, if you stand with your back to the entrance to the location. Inside, pay attention to the non-working gravity lifts. From this room, go down the stairs to the lower level. A little closer to the center there will be a door that can be unlocked with an existing pass. Activate the gravity lifts and go back up the same stairs, then use the elevator to go up another level.

The control room is a room hanging separately from the ceiling. The bridge leading to it is broken, so climb onto the railing, accelerate and jump over. Extend the bridge using the terminal, and then go back down and enter the shuttle. Before this, you can also complete one more side task - “Escape Attempt”. To do this, go down the stairs in the same corridor that we cleared from the large closet. You will find yourself at the escape capsules. You will be asked to blow up the hatch. Go out into outer space (the airlock on the lower level of the shuttle bay), get to the desired hatch and knock on the red latches. Return to the capsules, open the hatch on the panel and launch capsule 2. The reward will be on the lower floor in the toilet on the panels under the ceiling.

When you're ready, board the shuttle. There will be a terminal near the cabin - on it we move the file with the task parameters. Now you need to find Dahl's technique. To do this, we go into outer space. Once you're outside, Dahl will make your life a little more difficult.
"Dahl's Ultimatum." You are given 15 minutes of real time to complete it, and the outcome of the task affects the ending. We fly to the power plant gateway, from there to the life support compartment. We go to the atmosphere control point. If you did not fix the fan earlier, then we go around the perimeter of the room and on the opposite side of the entrance at the terminal we stop the fans, quickly jump down and take out the stuck beam. After this, we leave the recess with the fans as quickly as possible. Now we go to the room here on the second floor. If you stand with your back to the entrance, it will be on the left (Dal is in a similar room on the right). We start the disinfection procedure on the remote control. So Dahl will lose consciousness. If you want to save the survivors, then under no circumstances kill Dahl. Let's go to his room. The door is locked with a level 4 lock. It can be hacked, but you can also break the glass near the stairs and walk through it. Ahead there will be a wall with panels, one of which glows red. You need to repair the air mixture regulator lying around and put it in place. Now people's lives are not in danger and the timer will turn off. Now let's deal with Dahl's technician - Kaspar. We will go to the psychotronics laboratory in a way convenient for you. On the way, Dr. Igwe will contact you and invite you to look into the neuromod department on the task “Incapacitate Dahl.” To get to Kaspar, go to the director's office, and then to the passage in the back of the room (you need to allow access to the conference room at the terminal in this room). The desired operator will hide behind the mirror.

"Incapacitate Dahl." Completing this task will open access to one of the endings - without this you will also not be able to save the survivors. Let's go to the neuromod department. Just follow the marker and you'll end up at the surgical terminal. Using a computer, immobilize Dahl, scan the brain, and then perform a neurotomy.
Keys to Paradise (part 2 - Arboretum)
Go to Alex's office in the arboretum. The brother of the main character/heroine will be hiding in the back room - you can easily find the door using the marker. Open it and talk to Alex Yu. To save your brother, simply drag his body back to the utility room from which he came and lock the door. Next will be the actual endings.
Mind without limits
In this option, create a prototype of a null-wave jammer at the fabricator, go to the psychotronics laboratory and install it in the heart of the coral. Then you need to go through the arboretum to the bridge of Talos 1. There will be a choice here, but if you want to activate the device and not blow up the station, then kill “January”. Launch the null-wave device on the terminal. Watch the video - the game is completed.

Death
In this case, go to the power plant and go down to the reactor. In front of the glass doors in the floor, open the hatch and press the button. Go down into the passage that appears. Insert two activator keys. Then you need to go through the arboretum to the bridge of Talos 1. Activate self-destruct. Here are a few options:
- Die along with the station. Sit in a chair opposite, next to the window.
- Run away. There are several ways to escape. Firstly, on the shuttle, but Dahl must be alive. Survivors, if any, will go with you. You can also leave the station on an escape capsule. In this case, follow the quest marker “Who are you, December?”
Epilogue
This is the true ending - you will see it after the credits. Here you will be reminded of everything you did throughout the game. To get the best possible ending you need:
- Do not install neuromods in the Typhon skill tree. A little is possible, but without them at all is better.
- Rescue test subject Ingram in the psychotronics laboratory
- Rescue Dr. Igwe and then find his connectomes
- In the cargo compartment, help Sarah Elazar and set up turrets, and also prevent Dahl from strangling her and her people.
- Spare Dahl and leave him alive
- Bring the medicine to Ekaterina Ilyushina and let her listen to the compromising recording about her father.
- Find Danielle Shaw (knock on the glass in the fitness center) and then find volunteer 37 (cook Mitchell) trying to escape.
After you find out the truth, Alex will offer to shake his hand. You can either agree or kill everyone.
After eleven long years, a new game from the Prey series has finally appeared on store shelves, however, instead of a sequel, fans received a complete reboot, which has practically nothing to do with the original, except that you will again have to fight vile aliens in space. In addition, the new game has acquired a well-developed role-playing system that allows you to create a real killing machine out of the main character.
The project takes place on a huge space station, many of whose locations are open for exploration from the very beginning, so you can easily get lost in it. It is for this reason that we wrote a walkthrough of Prey (2017), in which we are going to tell you about solving all the puzzles and the most optimal routes.
First day at work
Put on the TranStar suit and board the helicopter
As soon as Morgan wakes up in his apartment, he gets a call from his older brother, Alex. He will ask the main character to put on a suit and board a helicopter to fly to a new job at TranStar, involving participation in a secret project on the Talos I space station.
We advise you not to immediately follow your brother’s instructions, but first look around your nice little apartments. You can search the compartments of your nightstand, read the various books lying around (these will be saved in the Data section, so you can refer to them later), check your email on your computer, and even grab some food from the kitchen.
When you're ready to leave, put on your suit and head outside. To do this, you need to go into the corridor and turn left (all other doors will be closed). Don't forget to talk to Patritsa Verma, the support worker along the way.
Head into the elevator and press the button pointing to the roof to go up. Exit the building and interact with the helicopter. Next, you will be able to enjoy a wonderful scene of flying over the city of the future.
Report to the testing center
Exit the helicopter and go inside the building to find the TranStar Research Bot. Talk to him for a bit, and then head to the elevator, where you will be greeted by Alex Yu. After a few minutes, you will be allowed to enter the testing chamber at the far door.

Inside, you'll find yourself in a small room with one button and a red circle on the floor near a window with three scientists standing behind it. First of all, they will ask you to press a button, after which three blocks will rise from the red circle. Then lift them up and out of the red area.
The next test will be a little strange. You will be asked to press the red button again and then hide. Naturally, there will be no places to hide in this room. Although you can try sitting behind a chair in the middle of the room. In general, do whatever you think is necessary, and then move on to the next test. It will be more straightforward. A wall will appear on top that will separate you from the other button. You need to press the red button to light the blue one and quickly lower the bottom wall in order to press the blue button. Simple, isn't it?
The final test room contains only a chair and a computer terminal. When you sit down on the chair you will be asked several questions to which you can give any answer you like. After this, the scientist will ask you to take an inkblot test. We advise you to pay attention to the researcher and his coffee, as something strange will begin to happen to them. When the “test” is over, everything will be covered in black.
Accident
The main character will wake up again in his apartment. Look at the calendar - it will again show March 15 (hello to Groundhog Day). Something strange is going on here. Inspect your home. You will probably notice that all the notes and inventory are gone, but a lot of emails have appeared on the computer. Put on your suit and get out of the apartment, for the second time.

However, now it will not be possible to talk to Patricia, since someone killed her and disfigured her corpse. Examine the body and take a wrench with you just in case. With it you can bludgeon enemies and destroy some objects. In a few seconds, someone named January will contact you, who sent you all the letters on your PC. He will tell you to find a way out of the building, since the main corridor will be blocked.
The doors in the main hall will be closed. Return to the apartment and break the glass panel to exit into the courtyard. A big surprise awaits you here, because the whole environment turns out to be an ordinary linden tree (now hello to The Truman Show). January will advise you to escape from the simulation chamber.
Once on the other side, examine the desktop nearby. There is an interesting note on the table. If you look at the window with closed shutters, you can see the rooms in which Morgan previously performed strange tests. Find the safe on the right side and try to open Marco Simmons' terminal (the required password is right on the table; it is randomly generated, so we won't write it down for you here). In it you will find a letter about poor installation, which will reveal the strange things that happened during tests with the buttons.
Leave the room and find a secret passage leading to your apartment and a door that gives access to the elevators. However, the first thing we advise you to do is check the warehouse area located in the opposite direction. Here you can find many useful items, including wine bottles that restore the hero’s life scale. The warehouse has doors leading back to the hall. You should pay attention to this detail and the fact that one of the supports looks extremely strange. Remember what happened to the fake scientist's cup? Basically, there's a mimic hiding around here somewhere that will immediately attack you if you get close to it.
You need to find two supports that are identical to each other and start hitting the key left and right. The Mimic will take off its camouflage and run to Morgan's apartment. Run after him and kill him. Next, go around the hall and find the door that leads past the fake elevator. You can try sending the elevator up and then the hallway projection will reboot.

Go to the roof - it will also turn out to be a fiction. After the entire illusion is destroyed, some walls will turn into ordinary glass panels. Break them and find useful things in the rubble. Then go into the TransTar building, examining the toolbox along the way. Hack Demetri Bowser's terminal, take the first aid kit and head to the testing area. Here another mimic will attack you. Crush the glass and destroy the monster.
Examine Chiao-Long Heng's computer, which will contain two emails, and listen to the audio log recorded by Marco Simmons - you will find it on the table. Get out through the destroyed door and go up the stairs, which will lead you to the simulation room. There are two monsters hiding in the control room. Here you can also find the body of Gret Mikkelsen with some nice things. On her computer, you can reload simulations and play with backgrounds. We advise you to break the glass pnael on the right side of the desktop in order to find useful items.

Return to the lobby, thereby ending up in Decontamination. They will show you how the mimic deals with Jovan Gravilovich. January will give advice not to go to the front line, but to act as carefully as possible. Take the first aid kit from the terminal and continue forward. In the offices located at the back, you can find Jovan's workstation with several letters. In one of them you can find a clue that says that Dr. Bellamy has a key card. This way you can get the additional mission “Vanishing Corpse”.
Walk forward until you reach the offices where the closed door is located. There are several solutions to this problem: you can open the ventilation hole on the right side or find the right key. Be careful, there are 3 evil Mimics in this area. Did you see two chairs at one table? So one of the chairs is a mimic. We advise you to definitely look at Ellis Aiken's terminal and read her letters. If you don't want to leave here through the ventilation (use the service hatch located on top of the cabinet), then you should return to Bellamy's office (stand with your back to the closed door and walk forward, keeping to the left wall) and look at the notes on the table. Here you will find the key card to the simulation laboratory.

Foyer
After leaving the simulation laboratory, you will come across a new type of alien - Phantoms. One of his representatives will be standing outside the window. January we recommend you go ahead. On the right side there is a locked door leading to the skill analyzer. Walk past and follow the bloody trail. As a result, you will reach the body of Veer Singh. A mimic will immediately attack you - deal with him. On the left you can find a broken console that cannot yet be repaired. Go along the corridor to the next corpse in order to take the GIPS gun. It shoots a special substance that can immobilize various objects. With it, you can also solve a variety of tasks, such as putting out fires, stopping electrical barriers and creating platforms.
Don't forget to search Singh's body to find a first aid kit and ammunition. Walk forward, looking around, and check the corpse of Natasha Nikova, which is hanging next to the air duct above the security room. Take useful things.
As soon as you reach the foyer, many mimics will immediately wake up and spread throughout the location, thereby hiding from you. This is where you will need the previously found cannon. You can't use it to damage Mimics, but you can freeze them and kill them with a wrench. You won't be able to get into the security room, so turn left and go into the conference room, where you might run into a Mimic. The body of Robert Gage and the transcript (audio recording) also lie here.
Here January will contact you again and tell you about the neuromod, which is hidden on the opposite side of the foyer. Deal with all the mimics in the room and examine their bodies. Neuromods are special items that provide the opportunity to discover new and develop old skills. The character has three branches of skills for development: security guard, engineer and scientist, thanks to which you can learn to hack complex systems and quickly restore your health.

Your choice will allow you to approach the solution of certain problems in different ways. For example, if you have the “Lever System” neuromod, you will be able to get rid of the barricade and go into the bathroom where the mimic is hiding and Hang’s corpse lies. You can also use the repair neuromod to repair the engraving shaft located behind the security room.
In the latter case, you will be able to activate the freight elevator on the second level, but this will only be possible if you have the required number of spare parts for repairs. If they are absent, you can use the GIPS gun and create a path to the wall to the balcony of the 2nd level, which contains spare parts, the corpse of a volunteer with ammunition and weapons.
It's also worth going back a little and finding Caleb Helethorn's additional terminal, located in the research room. Hack it to get a blueprint for making the Huntress dart thrower. Then you can go to the main hall.
While going to a new location, we receive a strange message from January near the body. We select cartridges, first aid kits and a shotgun from the corpse. Be sure to take out a couple of neuromods from your bag. We go to the main hall in order to understand where exactly we ended up.
We go down to the lower level. Here you can find many routes that we can follow, however, some of them can be unlocked only with the help of special upgrades, while others will be available only after completing certain main or secondary tasks.

Office with a great view
We watch the explosion, and then listen to the message sent by January. He will inform us that we need to go to Morgan’s office to watch a certain video. Please note that the space station lobby is a kind of central hub leading to several locations at once. Many of them will be closed for plot and other reasons. These zones include:
- Arboretum - located directly above the hall and can only be reached using the main elevator.
- Neuromod Department - located on the second level (we came from it).
- Shuttle bay - located on the ground floor next to the main elevator.
- Hardware Lab - Located on the upper level right next to the Neuromods Department.
- Life Support - located under the main lobby and can also only be reached using the main elevator.
How to get to your office?
So, in the main hall there are quite a few offices and rooms, including our personal office. Here you will also have to deal with a large number of mimics, so we move carefully, carefully watching for repeating objects. Before going to the office, we inspect the first level.
We approach the main elevator, with which you can get to the life support compartment and the arboretum. We notice a turret that attacks everything that seems to be infected with typhons, for example, mimics. We can take this weapon turret with us to use against a large number of enemies, luring them directly into the turret's fire. We examine the long table not far from the tower, on which there are first aid kits and a key card that opens the door to the emergency room.

To the left of the main elevator we find a closed area - a psychotronics laboratory, to open which you need a general-purpose access card or ingenuity (you will need a Hunter dart launcher, discussed below). We go to the staff room (on the left, if you stand facing the elevator), where facial expressions are waiting for you. Don't forget that we can walk around with a portable turret.
The door located in the opposite part of the hall can lead us to a bag with a first aid kit, and a route that is blocked by boards and leads to the psychotronics laboratory. There is also a path to the main staircase and restrooms. It will be difficult to get into the women's room, since it is covered with debris. In it we find the body of Martin Giraud and a gypsum gun. In the men's room there is a first aid kit and a couple of mimics.
There is an entrance leading to the shuttle area near the main lobby counter, but it will be closed. We find several corpses nearby. We go to the opposite staircase, guarded by mimics, in order to go to the security service room. We use a GIPS gun or a mobile turret.
Security office
The door that leads to the security office will not open without a key card, but we can get around without it. To do this, we climb the pipe near the steps (use the coiled fire hose hanging on the wall) and look for a passage at the top. We jump down and find a shotgun with cartridges. We examine Sarah Elazar's computer and read her letters.

There is a note here indicating the code combination for the interrogation room door. If we talk about the safe, then it has a 3rd level lock. We remember it (you can write down the location of the storage somewhere), so that later we can come here again and open it. The safe contains an EM grenade and a drawing for making shotgun cartridges. In the waiting room we find the corpse of Demetri Bowser. Don’t forget to pick up the note from the table to start the side mission “Stolen Neuromods”.
Before we leave, we check the table. In the corner we find a weapon improvement kit and a lot of useless files. The security station computer contains a lot of different information, including a list of all crew members present on Talos 1. It also shows their current status and location. We can start tracking them - we just select one person and start searching for him. After finding him in the terminal, a check mark will appear next to the name of the survivor. Be sure to download a map of the main hall from this terminal.
We leave the security office and examine the exhibition near the stairs. We find a neuromod and a first aid kit. We deal with the phantom (don't forget about using the turret).
We go up the left ladder to the 2nd level and go out onto the balcony, and then use the GIPS gun and create a platform to reach the upper balcony. We can go the other way: we go to the right and go up to the 3rd floor, since the doors to the living room and the emergency room will be blocked.
Directors' offices
We go up the stairs and watch as a garbage barrel rolls down on us. We are not afraid, since this is not a mimic. The alien was lurking upstairs. We kill him and examine the corpse of Laura McAvoy, putting all the items found in the inventory. Then we go through the door on the right side, where another weapon turret is located. Before heading to the office, we check all other rooms. We go into Bianca Goodwin's office and examine her computer. We take the key card from the emergency room (there will be two of them in this area: one lies here, and the second is below). Bianchi's terminal also contains a code for the door located in the neuromod department. In Bellamy's office we find a note and a workstation.
The entrance to Morgan's office will be closed, but our secretary, Jason Chang, has a password to the door. To do this, we check the assistant’s computer. Taking the combination from the terminal, we go to our office.
Once inside, we collect all the useful things and go to the computer. Log in and start the video. We turn to the monitor behind us and watch it.
Note: we find out the room where the video was recorded - this is the room for analyzing simulations, where there is a safe and a board with an erased code. If you look to the left corner of the room while playing the video, you will notice the required code: 5150.
Then everything will shut down. It is unknown why, but Alex does not want us to understand what is happening here. Dr. Calvino created the above-mentioned illusory panels, and therefore January will invite us to go to his workshop.
Through a glass darkly
How to get to Dr. Calvino's workshop
From now on, we have a little time to explore the surroundings more thoroughly. We take the pistol from the table and the key card. The note located on the computer talks about a safe - you can see it on the left side. We take out a drawing from there for crafting a GIPS gun and an upgrade for a weapon.
We should also inspect Morgan's workshop where the recycler is located. With the help of this equipment, we can process all the garbage we have collected into some useful materials suitable for crafting simple things in the fabricator (schemes will be needed). We take spare parts and other garbage lying in the room, not forgetting about the drawing intended for the production of a wrench. Next, we take the key card to the teleconferencing center. In principle, we can destroy the illusory walls, as we did in our apartments. This will create a path for us to get out. We enter the corridor leading to the service area, but it will be closed - here you will need a general level access card.

When leaving the office, we study a couple of things before heading towards the laboratory, passing by the conference room. Did we manage to make the Huntress dart launcher? Then we head to the first level to the blocked opening to the psychotronics laboratory. We break the glass on the right side and find the nearest workstation that has a door opening system. We shoot at the “Open” sign with a crossbow, thereby unlocking the door. By the way, unlocking doors is the main option of our new weapon.
Inside we find Elias Black’s work station and a locked safe of the 2nd level, where we take four neuromods and a weapon upgrade at once. However, the second door will be closed with a basic level access card.
Staff Lounge - Secondary Area
We return to the 2nd level, where there are two doors - one of them can lead us to the staff lounge. We can climb over the fence and follow the small path to the balcony in the middle. Here we break into the door of the 1st level. There are a couple of phantoms walking around in the IT Security room. Be careful, as enemies may move behind us or throw deadly yellow balls. We slow them down with plaster, and then deal with them using a shotgun.
We find a locked door in one of the corners, which can be opened using a key card. In another corner is an office surrounded by glass. We look for spare parts in it. By the way, on the wall there is a cabinet in which we find a neuromod and a stealth chip. We check the nearest table and take a key card from it, which opens access to the security office (however, we have already visited it earlier). Afterwards we examine the glass ceiling in the central part of the room. We climb to the top using objects standing under the ceiling surface and destroy the glass panel, thereby penetrating into the service room. Here we destroy a couple of mimics and take away the spare parts.
A couple of mimics also hid in the staff lounge. We destroy all the aliens, and then search the corpse of Randolph Hutchinson. We collect garbage from cabinets and use a recycler. We carefully examine the location to find the body of Octavia Figgs - it lies behind the counter. We find a useful thing from her.
Emergency room - secondary area
If you have one of the two key cards for the emergency room, we head to this area. She is on the second level. Inside we find the corpse of Anna Goldcrest. There is a workstation nearby and a tracking bracelet belonging to Dr. Bellamy. We read the letter in the computer, indicating that the scientist moved from this location to the psychotronics laboratory. download a map of the area.
Here we come across the phantom of Garfield Langley and the fire phantom, capable of causing enormous damage to us by setting it on fire. He will constantly cause fiery explosions under our legs, and therefore when fighting him we need to constantly move. We try to fight with the phantoms one at a time, luring them one by one to another location. We advise you to shoot at flammable objects when opponents pass near them. The Fire Fathom is an extremely difficult enemy, so we save before fighting him. After killing him, we use the station standing in the corner to call an operator who can heal us.
After clearing the center, we inspect the new territory. On the table we find a drawing for creating first aid kits, lying not far from Regina Seller’s locked computer (3rd level of protection). On the operating table we find the body of Luther Glass, from whom we take spare parts, a neuromod and an EM grenade.
There are several rooms here that we can visit. We find the key card in Khnedrik Devries's office. Next we head to Khol's office, where the body of April McGuire lies. There are a couple of emails on the computer in which we read the password to the quarantine door. Audio recordings of several scientists are also presented here.
We head to Chris Wade's office and find an out-of-work operator who needs repairs. We find a lot of spare parts and see a quarantine chamber from which screams can be heard. We check the cabinets, and then go in search of Jason Young, who is controlled by the Typhons. We can’t help yet, so here we have a choice - open the door and deal with him right now or leave him and come to his rescue later. We chose the second option. Inside his room, on the wall hangs the combination to the safe in Devries' office. To distinguish the code, you need to approach the window on the right side.
Teleconferencing center
Having thoroughly prepared, we leave the main hall and go to the teleconference center, located next to the directors’ offices. We use the key card to open the passage. We recommend arming yourself with a turret, because when the passage opens we will be immediately attacked by several mimics. We slow them down and retreat to the weapon turret.
We go further and find the corpse of Elias Black, from whom you can find a pistol, a drawing for crafting pistol cartridges, a kit for repairing a suit and cartridges. We leave the room and find ourselves in a hardware laboratory, which someone tried to close using a gypsum gun. We check the tables with spare parts and a broken waste disposal that needs to be repaired.
Hardware laboratory
First floor
We head forward and deal with the infected car. On the left side we see Ellis Hope's computer. The girl's corpse lies nearby. A little ahead on the same side is the entrance to Director Thorstein’s office. Those who have upgraded their hacking skills to level 2 should try to break into a door. However, we can find the code for it a little further in the “staff entrance” room, in which the gravity elevators are located.
We go up on one of them and take the transcriptor and find a computer on the table with 3 email messages at once (one of these letters contains the required combination). At the top level we will have to deal with the phantom director. We deal with the alien and inspect the elevator on the left side. There is a note attached nearby that gives a hint: Ex+Xe. These letters represent elements from the periodic table. If you combine their serial numbers, you get the sequence 9954. We enter it and take out several disposal grenades, pistol ammunition and an injector.

We approach the phantom's body and take the key card, which opens access to Jorgen Thorstein's cabin. We go down and go deep into the level. We deal with the phantom and another infected robot. However, the alien may not be here, since he came to us from the 2nd level. On the right side we see a locked door. There is a security office in front, enclosed by glass. We bend down and go inside. In the left closet we find an upgrade for weapons. We approach the computer and open the door of the storage room located nearby.
We go through this door and take all the things. We can jump onto the pipes and climb to the next level (if we were not able to open the door to Thorstein’s office earlier). However, we are in no hurry to do this. The passage ahead will be blocked, as we will need a staff entry key card. We follow the remaining path and find ourselves in the cinema. We search Sean's body lying on the chairs and find the required card. We get down and jump down. We open the hatch and shoot from the gypsum gun into the hole in the pipe. Then we shoot at a puddle that is energized. Let's go further and examine another body.
We go back and open the door on the left side with the previously received card. We deal with the phantom and approach the door. It will be closed. We explore the room and go back to the security office. Inside we look through the names of the entire crew. We find Lorenzo Calvino in the hardware laboratory and begin tracking him.

Second floor
Using the gravity elevator, we go upstairs and search the body. We go into the next room with offices (don’t look at the marker), in which there is a terminal with a password for the director’s office. There is also a workstation with a password for the storeroom (we find the combination to the terminal itself in a note that is lying on the floor very nearby) of the machine shop. We head through the passage with the plaster and find the girl’s body. Here we also select a kit for upgrading weapons.
We follow to the indicated point and find out that Lorenzo’s body “lies” in the room in which a gap has appeared (the seal is broken). To get into this room you need to go to the machine shop. We turn around and go to the door on the right. We find ourselves in the medical compartment. We open the hatch and crawl through the ventilation hole to another hatch, dealing with the mimics along the way. As a result, we find ourselves in the right place.
We go along the pipes to the right side and jump down on large objects. In the left room we find the terminal and use it to move the cargo platform and distract opponents. However, it is best to destroy them. We deal with several mimics and three robots, and then examine the remote control. Click on it to open the gateway.
Before we leave the station, we create the Artax propulsion system. Below we find a door leading to the pantry. We found the code for it on the second floor. Although this door can be opened (level 1 hacking) or climb to its roof and use the hole on it.

Next, we approach the gateway and stand facing it. On the left side we see white bales. We jump on them and make our way to the workstation, where there is an Artax drawing. We take it and produce a rocket launcher using the fabricator. Fortunately, you don’t need a lot of materials for this. We jump onto the cargo platform with the body to check the installation. Hold the Space button to float in the air. Now we exit through the airlock into outer space.
Station sheathing
To move around the skin we use standard movement keys. To speed up the movement, hold down the Shift button. To quickly stop, you need to simultaneously hold down the E and Q keys. We get to Calvino’s corpse and search it. We take the pass, a couple of neuromods and transcriptors. We go outside and return to the gateway.

Atrium
We are again inspecting the hardware laboratory. We pass through the doorway into a room with gravity elevators. We come across a sparkling console next to the exit - we neutralize it for a while using a GIPS gun. By the way, on the left side there is a hatch behind which there is a power supply control panel. If we had the Level 2 Repair skill, we could turn off the power supply and repair the console.
We see a light in the corner, turn right and find a passage. We go there and notice a ballistics laboratory on the right, to enter which you will need a pass. However, it is quite easy to find it. Using a gypsum gun, we close the pipe with the light and search the girl’s body. We find the necessary key card, a kit for repairing armor and several other useful things.

We go into the laboratory and take everything that is not screwed to the floor. On the right side we find a computer with important messages and a safe with level 1 protection. We can hack it, but we used the code (3100), which was written on a piece of paper hidden behind a couple of black boxes and a door near the left wall, next to the capsule. We go to the end of the room and find another workstation. First of all, select the inscription “Launch a disposal grenade”, and then open the capsule (we dealt with the mimics a little earlier) and take the materials. We bend down and go under the platform on which the terminal is located. We are looking for a few more materials.
We go to the atrium, located on the 1st floor and find a passage where there is a sign with the inscription “Demonstration Scene”. We go down and take out the neuromod from the briefcase. We go up the plaster path and search the body. After opening the hatch, we crawl into the ventilation hole, where we find ammunition for the pistol and spare parts.
At the lower level we kill the phantom and, if necessary, use the disposer. We head back to the previous area, having dealt with another phantom along the way.
Return to the main hall
We head to Morgan's office, destroying all the mimics and phantoms we encounter. Opponents, by the way, will be stronger than before. Don't forget to use the freeze gun if necessary. We watch the video, and then talk with the operator nicknamed January. We take the public access key card, which opens access to many new locations. When playing the video, pay attention to the board on the left side of the main character, on which the password 5150 is indicated. Using this code, do not forget to unlock the safe located in the very first area.

We take the neuromod thrown by January and break the glass panel on which we watched the video. This will allow us to see another illusory wall.
Detour route
We will receive a mission according to which we need to go to the morgue located in the psychotronics laboratory. When approaching the desired door, another operator named December will contact us. He will note that we left special instructions for him that could help him get out of the station.
Who are you, “December”?
We go to the neuromod department (first location), deal with the opponents and begin a thorough inspection of this area. Previously, we managed to find the code to the volunteers' cabin. She is located on the 2nd level of this location. There are two routes we could take to the top. You should either go to the point where we found the GIPS gun near the corpse and find a couple of elevators, or go to the security office, fenced with glass, and hack the level 2 console. In the first case, we will need to repair the control panel by spending several spare parts, and in the second, we will be able to download a map of this zone and open the entrance to the ability testing room.
We chose the second option, thanks to which you can unlock two passages at once. The door next to the transition to the main hall can lead us to the lower level. Here we find several useful things, examine a couple of dead bodies and study the computer. Next we head to the elevators and go a little to the left. There is a second door here. We follow through it and under the stairs we find a body with a neuromod. Next we go upstairs and find ourselves on the second level.
After going up the stairs, we notice a large door on the left side. We are not in a hurry to go to the balcony, where the phantom is waiting for us - first we go through the test rooms, kill the mimic, and then deal with the electric phantom and a couple of mimics. Don't forget that an electrical enemy is capable of damaging the GIPS gun and attacking us simply by being on metal objects.
Having dealt with everyone in the room with the chair, we find a couple of neuromods and a lot of good things. By the way, there are three first aid kits in the medical compartment.

We go out onto the balcony and examine the body near the hatch. We deal with the mimic and crawl into the tunnel. We jump up and walk along the beams, at the bottom of which the main hall of the neuromod department is located. Here we begin the search for a new corpse.
We go back and approach the door leading to the volunteer cabin. Don't know the code yet? Use this: 6861 . We get inside and begin to wander in the dark. We move a little forward and turn right, dealing with all the aliens. We pass through the shower and climb into the hatch. We activate the power supply by interacting with the console. However, the shower floor will become electrified. We get out of the hole and climb up the ladder on the right side as quickly as possible. We go through the door at the back of the room and examine the cabins, collecting various things and searching the bodies. We go to the exit and go through the right door.
By the way, we could get into this room through the ventilation duct - the corresponding hatch is located behind the table. On the table we find a drawing of the Stunner shocker.
Now we will not be able to get into the last zone of the region - production - since this requires a special code. It is almost impossible to hack the panel, since this requires a level 4 skill.
Therefore, we continue to complete the main quest. We go to the place marked with a marker and deal with several enemies. We find ourselves in a briefing room with a safe. We open it using the previously found code (5150). If we talk about the pass, then we climb onto the electrical cabinet and look for a note informing us that Alex has the key card. In the suitcase we find various things, including a stun gun.
We head to the foyer of the neuromod department, where we are advised to come by December. Once in the right place, we see how January destroys it, noting that it is a defective model. We examine the remains of the operator to find a note containing the code to access the safe located in Alex’s office, located in the arboretum. We will go to this location a little later.
Psychotronics Laboratory
We head to the main hall of the station and go down. We kill the electric phantom and unlock the passage leading to the psychotronics laboratory, thereby moving to the next area.
We move forward and notice a security room on the right side. We can open the code panel (2nd level) or destroy the glass panel, and then use the crossbow to get into the terminal to open the door. Inside we find a lot of useful things. We also download a map of the area from the computer.
We go along the only road leading forward, that is, we turn left. We deal with all the opponents and try to move a little further forward. However, we will receive a message that, without having a psychoscope in hand, we will not be able to go further.

We turn around and head to the showers, located on the left side - we have not been here yet. We look at the body near the hole in the floor and jump down. We deal with all the mimics and move along the corridor to the very end. We find another dead scientist. We find a psychoscope from him.
Thanks to this device, we will now be able to scan facial expressions. The more aliens we can scan, the sooner we will discover new psychotropic skills. Let's add that the helmet also has slots for upgrade chips. One of them, by the way, is found directly on the corpse of the above-mentioned researcher. With its help, it will be easier to recognize disguised aliens.
We go back and start following the marker. We go up the elevator and listen to Alex's message. We scan the typhons located in the capsule on the right side (there are 4 of them, but only one will be open). As a result, we get the aliens' first ability - Kinetic Explosion. In addition, the mission “Detour” will be completed.
Dr. Keilstrup's Neuromods
Alex will tell us the password to the safe, which is in Director Keilstrup's office. It's worth heading to this office. We break the plaster in the nearest window and go next to the disposal. Next, he opens the hatch, bend down and go forward. We find the power supply console and turn it off. Then we approach the body and search it - we find 2 new key cards. Open the director's vault and take from there a blueprint for a neuromod and 1 finished neuromod. We activate the power supply again by using the GIPS gun on the broken panel and open access to the conference room by selecting the appropriate function on the terminal.
Next, take on the side task “Copy Protection”. Although we write about secondary missions in another article, we still decided to consider this one here, since it is partially related to the main storyline. So, to receive this quest, we create 7-8 neuromods according to the previously found drawing. After this, the system will automatically prohibit us from making more of these items. Then Alex will contact us and inform us that we need to get into Holden Graves’ office, which is located in the neuromod department.
Copy protection
We run to our first location and take the elevator to the 2nd level. We are trying to get into a closed room - “Production”. We can do this in three ways: find the access code, open the level 4 console, or go through the mine.
We go to the volunteer cabins and enter the room on the left side. Here we find a hatch. By the way, to navigate in the dark, don’t forget to use a flashlight (the “V” button). We open it and jump to the top of the shaft using the gypsum gun. As a result, we find ourselves in the required compartment.
Here we will meet a powerful enemy - the Technopath. First of all, we deal with all the mimics, and then we deal with the boss. For this we use disposal grenades and a shocker. Graves's room is located on the upper level, but to get into it you must first find a dead body with a pass. We build a path from plaster to the ventilation hole leading to the roof of Graves' office. Then we climb inside.
In the office we deal with the mimic and use the terminal to renew the license for the development of neuromods. We examine Graves' body and do not forget to open all the doors using the workstation. We go down and find a glass room in which we find many useful things. We return to the main hall and go to the psychotronics laboratory.
We go into the director's office and go down the stairs behind the door. We break the glass panel and collect all the important items. A phantom will appear - we deal with it and go back up. We head to another area of the laboratory and go up the stairs on the right side. This wing has several rooms. We search them all and find a dead body and a couple of neuromods.
There will be even more enemies in the new zone, but we won’t find anything useful here. We study the corpses and take on a side mission called “Truth Lover.” For the last action, we find a room with two bodies - a girl lies on the table. Here we also come across several mimics. We search the scientist and take away the Analyzes transcript. We listen to him and get the quest.

Between these wings there is a second gateway, which is also worth opening. We go down to the lower level and follow the marker. Behind the glass panel we scan the new alien - the Weaver.
We turn left and go forward, destroying the mimics and overcoming the fire with the help of the GIPS gun. Afterwards we head left again towards the arsenal. We will not be able to open it from this side. We go into a spacious room for processing raw materials and talk with a bald man. We release him and find out the code from the arsenal. We can send an alien to it, but then we won’t be able to see the password like our own ears. Although you can get into this room without it by hacking the access panel.

We go back and turn in the other direction. As a result, we find ourselves in a room enclosed by glass. Here we find a corpse. To complete the test, use the computer and open access to the Weaver. He will make a phantom out of the corpse. We destroy the aliens and search the dead body.
SAGITT
Detour route (continued)
We move forward using gravity, flying through tunnels and avoiding meeting aliens. One of the doors we meet will be locked - we can find the code or break it (2nd level of protection).
At the end we come across a door that can only be opened with a pass. We fly away from it and begin to climb up - we notice a magnetic field. We pass through it into a zone with normal gravity.
We ended up at the magnetosphere control station. We go through the doorway on the right side. We examine the girl’s body and take the transcriptor. We listen to the recording and look for a computer with letters in the corner. As a result, a new task, “Project Blackbox,” is activated. At the workstation, be sure to load a map of the area.
Project "Blackbox"
The main task is to find the body of Josh Dalton. We perform it after finding a pass that opens access to the service tunnel.
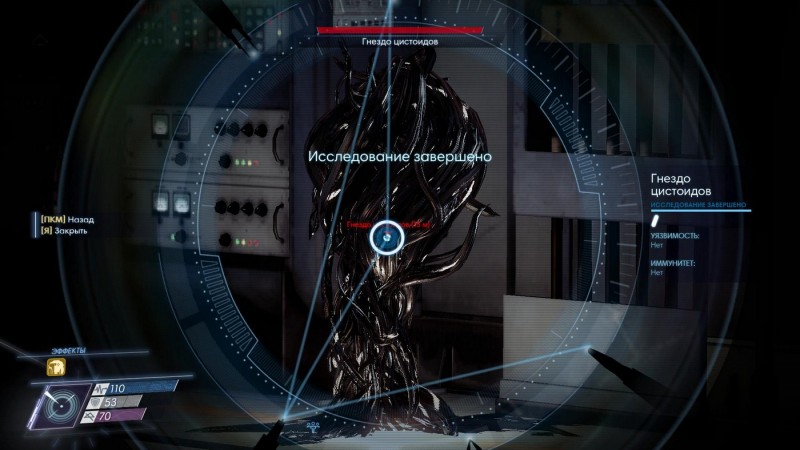
We go upstairs and deal with all the nests. We wait until the ejection occurs, and then we enter the gravitational field and find the corpse of a dead man dressed in an orange suit. We find the required key card from him.
We go back, destroying infected robots along the way, and go through the tunnel into the cargo compartment. It is here that we find Dalton’s body. In addition, from here we can now get to the arboretum by finding the appropriate entrance.
Arboretum
We deal with the mimic and, if necessary, use a fabricator and a recycler. We examine the man’s corpse and listen to the audio recording. As a result, we get the secondary task “Dissatisfied Employee”, to complete which we will need to go to the data warehouse sometime.
We go up the stairs and come across Typhon behind the door. We go a little forward and crawl into the shaft, from which another body will hang. While inside, we receive news from January, who will give us another mission - “Problems with the elevator.” Although it is a side task, it is connected to the plot, since after completing it we will be able to use the elevator and easily move from the main hall to other locations of the station.
Problems with the elevator
We get out into the foyer and go towards the main elevator. We go to it and find ourselves at an intermediate location. Here we deal with the terrible Technopath. We use electromagnetic charges to neutralize it, since after using them it will not be able to throw ball lightning. You can deal damage to him using a shotgun (turn on rage mode) and disposal grenades.

After defeating the enemy, we complete the task - from now on we will be able to quickly move on this elevator to three main locations: life support, the arboretum and the main hall.
Note: Don't forget to search Devries' body. We can find a key card from him that gives access to his office. After listening to the recording on the transcriptor, a new additional mission “Do no harm!” will appear in the journal.
Next we go up to the storage facility. Next to the descent into the vault is another gravity elevator leading to Alex's office. However, before we go there, we will need to turn on the elevator. We can either find a suitable code or open the console of the 4th level of protection.
Although there is a third way - we go back and go down the slope. On the right side we notice a waterfall (it is an illusion). To the left of the waterfall there are steps directly on the mountain. We climb the ones that are available. The next ledge will be very high, so you won’t be able to jump to it. We use the gypsum gun and create additional steps for ourselves. As a result, we get to the top and find ourselves in Alex’s office.
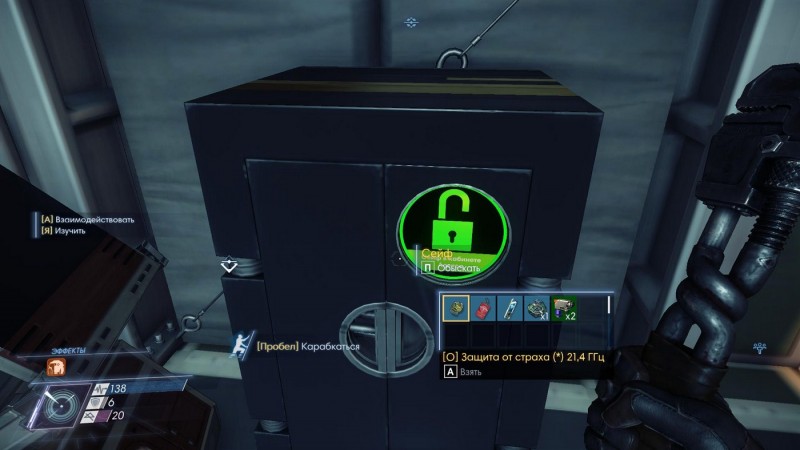
While in Alex’s office, we move the drawer (2nd level) - we can’t do without it - open the safe (using the code received from December) and see what’s inside. We find the key card to Alex’s cabin, located in the living compartment. This is where we will need to go very soon. In the meantime, we return to the data storage and go down. We study the door and find out that it requires voice confirmation.
Collecting votes
We search the corpse nearby and find the transcriptor. From it we learn that others have already tried to fake Shaw's voice. We also take the pass to the residential section from the body.
We return to the point from where we arrived here - we go through the ventilation hole (hatch on the floor). On the right side there is a watering device with a red button. There is a note on it. We read it to receive the secondary task “Gardening Tips.” Next we head to the living compartment.
Residential section
It's time to visit a new area. We leave the arboretum and walk next to the security office, and then go downstairs. We open the door and go to another location. Here we deal with several infected people, go a little forward and listen to the cook’s monologue. The side quest “The Cook’s Request” starts.
We head to the room on the right side, to the recreation center. Here we deal with the mimic and the Poltergeist. We can go higher, but we won’t do that for now. We go back and stand with our backs to the starting area. We see a ladder on the left. We pass a little to the right of it, move the boxes and find ourselves in the medical bay.

We collect all the important things, and then climb the previously found ladder. On the left we see a room. We go inside and stumble upon a phantom - Regina Sellers. We kill the enemy and search his body. As a result, we find a key card that opens the entrance to a place called “Restricted Drugs,” which is located in the neuromod department. In the current room on the left you can find an upgrade for weapons and an access code to the gravity elevators located in the directors' offices.
Cook's request
Since this quest can be completed during the course of the plot, we will describe its completion. We follow the marker and deal with the Technopath. We kill the remaining enemies and approach the blinds to talk with the cook. He will give us a key card to his cabin and ask us to find a reward.
We go to the indicated point and stop near the water on the floor, since there is an electric phantom ahead. We lure the monster out without setting foot on the water, and then kill it. We go into Mitchell's apartment and listen to the audio recording that lies on the table. This will allow us to process 10 percent of Shaw's voice, which is necessary to complete the Collecting Voices quest.
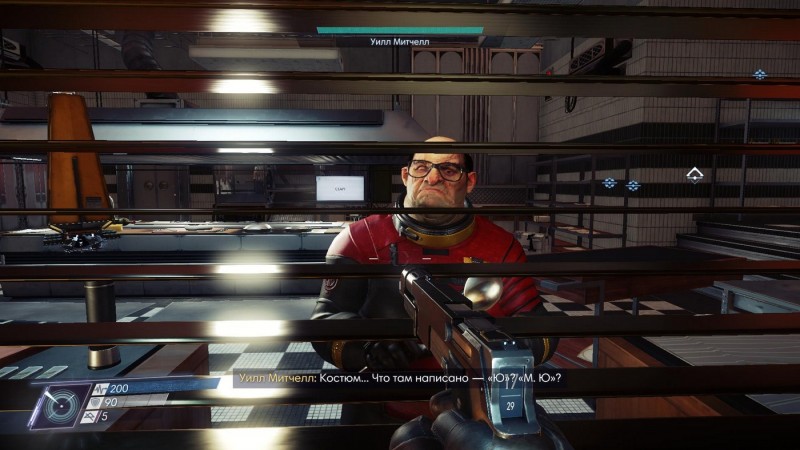
We examine the computer, where there is a password to the directors’ offices (you can get there by elevator). We take the reward given to the best cook and located on the nightstand, and then return to the quest giver. We give him the item and go inside when he unlocks the side door. We talk to him and get a new mission. He will tell us to fix the water tap. The necessary spare part is located in the arboretum, in the greenhouse. We go there and deal with the Technopath. Before that, we hack into a workstation with a low level of security.
We go back and replace the spare part, placing it in the place where the marker will point. We wait for Mitchell to unlock the refrigerator and go inside. After a few seconds he realizes that we are trapped.
Having woken up, we are trying to get out of the trap. We examine the side freezers to look for new weapons, neuromods and other interesting things. We open the refrigerator on the left and search the corpse. We study the audio recording and process Shaw’s voice to 30 percent, plus the “Daniella Shaw” quest will begin.

We remove ice blocks (Level 2 Lever) if we can. Otherwise, just shoot at the pipe on the left side so that the fire melts the ice. You can even throw a disposal grenade at the obstacle. Next, we crawl through the ventilation hole and find ourselves in the kitchen, thereby completing the mission.
Truth-seeker
We follow the marker to the living quarters for workers and search the body of a girl who worked in the station security service. We listen to the audio recording from the transcriptor lying nearby.
We head to the beginning of the area. On the side of the broken elevator in the corner we notice a concierge desk, which is the security point of this location. We load a map of the area and listen to the recording from a special mechanism. Then we study the report.
Collecting votes (continued)
Now we follow the marker and head to Danielle's apartment. We examine the cabins and listen to the audio recording on the transcriptor. Don't forget to also view your mail on the terminal. A new additional task “Treasure Hunt” starts. We continue to look for Shaw's recordings at other locations.
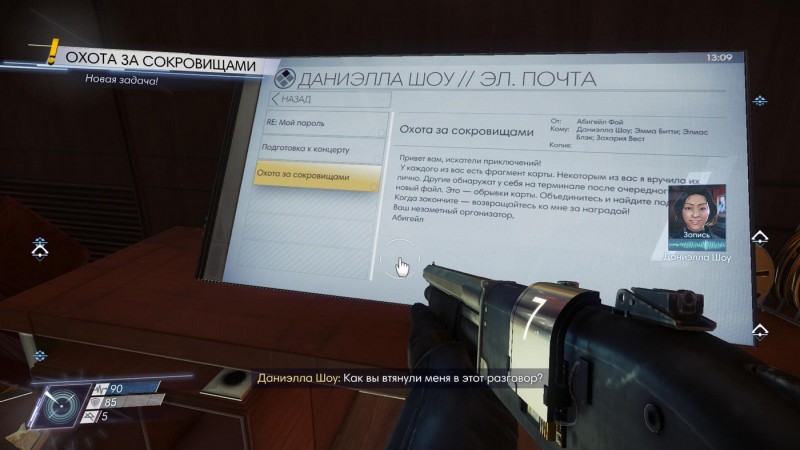
We go up to the second level and find a cinema. We go inside and see a couple of cinema halls on the left. We go into the farthest one and on the second row under the seats we find a transcriptor. We listen to it to get a new voice sample.
On this floor we find the “Yellow Tulip” bar, where the electricity will be cut off. In the far corner on the right we find a hatch that leads to a ventilation hole. We use the console to activate the power supply. We return to the bar and go into the small room on the left side of the scene. We listen to a recording of a song performed by Danielle. We wait for the timer to expire and deal with all opponents. You need to find 2 more notes: one of them is in Skye's capsule, and the other is in the recreation center.
First we go to the center and rise to the second level. On the table we find the key card for Abigail Foy's apartment. We follow the marker and unlock the cabin. We look through the terminal and select the bottom letter. This way we will know where to look for the next sample - it is with Emmy Beatty. Don't forget to listen to the recording here, collecting 90 percent of the vote.

There are several beds in the crew living compartment. Pay attention to the top ones. We jump on them and look for a transcriptor on the shelf that belongs to Lawrence Baxter. We listen to the recording to receive the side quest “A Gift from a Lover.”
We go back to the recreation center and go up to the upper level. We find the transcriptor on the table and listen to the audio recording. As a result, we get a complete sample of Shaw's voice.
Who are you, “December”? (continuation)
In this location we can also continue completing this additional quest, which is directly related to the plot. To get into Alex's cabin, enter the password for the gravity elevator located on the first level in the foyer. We head upstairs and go to my brother’s apartment. We hit the globe standing on the nightstand and find the key card to the escape capsule.

Next, we can go to the arboretum and climb into the rescue capsule located at the top of the location. When we fly away from the station, a false ending will be shown and we will have to start from the last save. Therefore, we simply take useful things from the capsule and leave it, continuing the passage of Prey (2017). In the finale, we will be able to use this capsule to leave Talos 1, but this will be a bad ending.
Collecting votes (final)
Having the code to the training room in hand, we head to this area and deal with all the enemies near the pool in it. Next, we approach the window and wait until Shaw appears. She will tell us that the cook is impersonating someone else. The quest will be completed and the Danielle Shaw mission will be updated. Now you should go to the data warehouse.
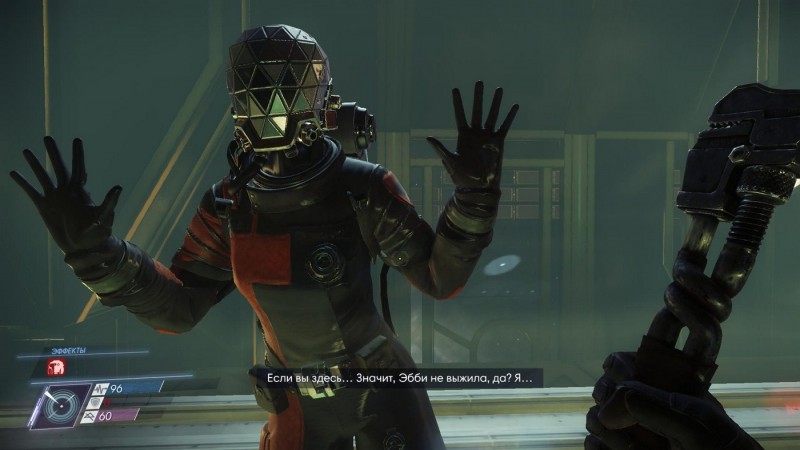
Data store
We pass through the arboretum to the passage leading to the data storage. We play back the previously received voice recording and move forward. We receive a message from our brother, who will tell us that he has closed us here.
Restoring from a backup
We deal with all the enemies ahead. We break the glass panel around the corner of the left building and shoot from the crossbow at the button next to the door. As a result, we find ourselves inside the structure. Here we activate the computer and open the large door. We continue to go forward and reach a room that has no gravity. We follow the marker to the hard drive, pick it up and lift it to the console that controls the server. During the approach, the hard drive will automatically connect to the panel.

We go back and jump up, using the racks for this, and then we make our way into the room with the desired console. We examine the panel after killing the enemy.
We open the hatch to reset the modules and go to the marker. To get into the desired room, we will need to move the cabinet (Level 3 Lever). Open the door and move the hatch. Then click on the button and watch the cutscene. By the way, you can also get into this room through the ceiling or by using a disposal grenade.
Dr. Igwe
We wake up and press the button to open the gate. We fly behind the marker to the cargo compartment. Here Sarah and Dr. Igwe will contact us.

The doctor is captured - he is in a container and very soon he will run out of oxygen. We fly to the required container and look at the dial - its number is 2312. We can unlock it right now, but then Igwe will die. We decided to save the scientist, so we flew to the cargo bay.
As soon as Sarah reports that the compartment is in a closed state, a new marker will appear nearby, pointing to the computer. We use it and enter the container number (2312). Click on docking and wait. The doctor will be saved, and we will receive our share of praise. Next, open the container and fly towards it to enter the cargo compartment.
Cargo compartment
Reception and dispatch
The main mission will be updated. We kill the enemies outside and approach the large door. The fabricator and the recycler are in a switched off state, since no electricity is supplied to them. We go upstairs on the gravity elevator and talk with Igwe to complete the additional task and receive a reward. Afterwards we talk to Sarah.

We follow the marker, which points to the switchboard. We find a door nearby that can only be opened by brute force (by the way, we won’t see anything like that in the game again). We turn on the shield to supply electricity. From now on we can use a fabricator and a recycler.
We get out through the previously docked container and fly to the sign. We deal with the Weaver and take the drawing of the turrets from the safe (we received the code for it earlier).
However, it is not necessary to create these weapon turrets, because they can be found. We will need to place 3 turrets opposite the passage leading to cargo compartment B - the desired area is marked with a square on the floor. We can find the first turret near the entrance to the survivors’ camp. The second one is hidden inside a side cage - open the computer on the first level and open all the cages (or remove the cargo on the second level above the desired cage and use the hatch in the floor). We leave the camp and look to the right.
We notice a container on the upper conveyor. In it we find an upgrade for weapons and a third gun turret. These turrets will be enough to protect the compartment. Next, we wait for the code to be issued, open the door and kill all the enemies. This will complete the task.

Truth-seeker (continued)
We go forward and find ourselves in a room with many containers. We can try to open all of them, but we won’t find the required item. We pass through the nearest door and find ourselves in the loading bay. We see a box ahead with a digital lock of the 2nd degree of protection. We hack it and find the desired body. We take the flash drive and finish the mission.
Life support
We leave the cargo compartment and find ourselves in life support. We deal with the ethereal phantom ahead and receive a message from Ekaterina, in which the girl will offer us her support.
Reboot
We go up the right stairs and turn right to get into the medical compartment. To do this, push the heavy locker (Level 3 Lever is required).
We go out and look for the entrance to the restroom opposite the medical bay, which is closed with stones. We break them all and collect useful items. We look for a piece of paper on the girl’s body, which says that there is a hiding place near the rescue capsules. We get out and repair the turret in the corridor. We search all the bodies and find out the code to the safe, but you won’t be able to get into the security office without the appropriate key card.
We go down and shoot at the broken console from the GIPS gun (we can simply repair it). Next we go into the gravity elevator. We follow the direction of the sign straight to the reactor.
We look around, we can, if possible, open the door leading to the pantry and having the 3rd level of protection. In it we find a turret, 3 neuromods and several other valuable things. We go along the corridor and pass behind the elevator (follow the marker). We deal with the enemy and go into the room with capsules. In the middle of the capsules on the left side we find the girl’s body and find her audio recording. We listen to her, thereby activating the side quest “Sobering up.”

We go back and go forward. Being at the fork, we turn right and go into a new area - the power plant.
Power station
We continue to go forward, and then go down. At the end of the path we come across a door locked with a digital lock. The pass to it is located nearby - take a closer look at the light on the left side. Behind him lies a dead body. We extinguish the fire using the GIPS gun, approach the corpse and find the key card. We break open the door and talk with Ekaterina. We can help her solve her problem or leave the girl to her fate. We decided to give the young lady a helping hand.
We return to the cargo compartment and get out into space. We go around the ship and approach the control point. There we find a breach in the room. Next, we take out the required medication from the nightstand. We go back to the girl and give her the medicine, feeling like a knight on a white horse.

Next, we go down the gravity elevator and head to the reactor. The reactor control room is located deep below, and therefore we boldly jump and stop the fall with the help of our rocket engine. After landing, we climb onto the roof of the room and move the door (Level 2 Lever). We can also try to pick the lock (Hack Level 4). In the room we hack the computer and begin the procedure. When switching levers, we carry out the following combination: 3 left ones from left to right, and then 3 right ones from right to left.
We head into the reactor and make sure that it is faulty. We reach any element or repair a broken part (Level 3 Repair). Then we continue to restart the installation.
Then we get out of the room. We try to destroy all opponents using turrets located in the neighboring warehouse. Afterwards we save and begin the ascent. We make our way up the stairs located on the building with the reactor. We jump onto the roof and climb along the panels near the windows and curved pipes. Next we move on to the blue pipes. In the end, we find ourselves at the very top.
In the new location, opening fire is strictly prohibited, otherwise an explosion will occur. Therefore, we destroy the aliens using an adjustable wrench. We get to the elevator and head to the arboretum.
Key to Heaven
We go to the elevator - Alex will give us the password to it. We go upstairs, and then we enter my brother’s terminal and start the video about the “Mirror”.
Alex will ask us for one more favor. We agree, take the chip and install it in the psychoscope. We go outside and follow the sign. Getting ready for battle. By the way, we advise you to collect as much ammunition and first aid kits as possible at this stage. We scan the Coral node using the helmet, and then return to the office and upload the data to Alex’s workstation.
Shuttle bay
After downloading information about Coral, Alex will tell us that he will not leave until we deal with Dahl and his crew members. You will need to go to Dahl's shuttle and ask him why he came to the station.
We follow the marker to a new area. We go down and kill several enemies along the way. We see that the shuttle is closed, since the entrance is located at the top, but there is no bridge connected to it. To get on the ship, we go to the lower level, located under the common room and in one of the rooms we look for a dead body (we find it on the seats). We search the corpse and take the pass from him.
This key card opens the door at the bottom of the area. We unlock the door and engage in battle with the electric phantom. We destroy the remaining enemies and find the terminal with which we turn on the gravity elevators. Using one of them we rise higher. We run up and jump over to the doors of the room where the bridge control panel is located (it is located above the rest). Inside we find the computer and activate it to extend the bridge. We climb into the shuttle and find a file on its workstation that can be downloaded.
Where can I find Dahl's technique?
Finding this character will not be so easy, because the game will not mark him with a marker, so we had to fly around almost the entire station. We'll tell you exactly where it is. We fly to the gateway of the arboretum. Next to it is the “Breaking in the Living Compartment” control point. Near the airlock, right in the metal debris (not opposite the hatch, but behind it), we find a robot named Kaspar. Outwardly, it is similar to other operators. We'll have to deal with him.

Next, we help Sarah Elazar and other people in the life support compartment, without sending Dahl to the next world. As soon as we find ourselves in space to search for a technician, Dahl and Sarah will contact us. It turns out that the shuttle pilot decided to cut off the oxygen supply to the cargo compartment, so we will have no more than 12 minutes to save Sarah and her people.
We can save the station personnel or leave them to their deaths, since this task is of a side nature. However, after passing it, we will be able to influence the final if we deal with Dahl.
We decided to help Elazar. We go through the power plant airlock and go to the life support compartment. Here we will have to face a large number of opponents. We follow the sign and find ourselves in the room for controlling the oxygen supply. Dahl is standing here too. If we decide to kill him, we will thereby fail Igwe’s mission to neutralize the pilot and will not be able to get out of the station, because only Dahl is capable of flying the shuttle.
Therefore, we bend down and walk past Dahl to the right side of the room. Here we select the fallen element and insert it into the console from above. That's it - we saved all the people in the cargo hold.
Key to Heaven (continued)
We return to the arboretum and head to Alex’s office. This is where my brother will contact us. Around the corner we notice Dahl trying to open the door.
We have two ways:
- We deal with Dahl, that is, we kill him simply and without sophistication.
- We neutralize Dahl. To do this, we use either the Typhon skill “Electrostatic explosion” or a stun gun (it may not work).
Then we interact with the control point and talk to Alex. We take from him a drawing of a null-wave device and watch in horror the appearance of Alpha Typhon.

Here we can do 2 side missions at once: save Dal (if we haven’t dealt with him) and Alex. To save our brother, we simply drag him into the bunker, and then close the door. To save Dahl's life he will have to tinker a lot. We take his body and drag it to the transition to the location “Hall Talos-1”. On the right side in front of the door we see the entrance leading to the medical bay. If we have not previously repaired the broken panel, then we should not carry Dahl near it, otherwise he will die from an electric shock.
For this reason, we first repair the console (using a GIPS gun), and only then drag Dahl into the room. We move it around the room until the mission goes to the completed section. Further passage of Prey (2017) is associated with obtaining one of two endings. You can read about this in our
While playing Prey, you will constantly come across doors and safes that are locked with digital locks. And here you have several options. You can very carefully search the station around, reading all the letters, papers, books and listening to every audio recording. This, of course, is incredibly interesting, but there is a chance of missing something important. You can also level up your Hacker skill in the Scientist branch, but you can add neuromods to greater benefit. So we recommend that you simply read our guide and get all the information you need in one place. For convenience, we have divided all the codes in Prey by location name. Enjoy!
Neuromods Department
- Security booth- you can get this code only after you advance further in the story and return to the neuromod department again. In the lobby you will find the corpse of Divya Neaaz, near which there will be a note with a code. We marked on the map exactly where to look for the corpse.

- Safe in the recovery room- the code of this safe is 5150, it never changes. The safe itself is located inside the room with the Simulation Debriefing sign.
- Volunteer Cabin- you will have to look for this code yourself, everyone has their own numbers. Go to level three halls of Talos-1, to the directors' offices. The exact location is shown on the map. There you need to find Bianca Goodwin's computer and read the letter entitled Volunteer Behavior.


Talos 1 Hall
- Morgan Yu's office- in fact, January will give you the code for this door in any case as the story progresses, but if you don’t want to wait at all, just enter the numbers 0451. This password is the same for all playthroughs.
- Interrogation room- to get into this room, just enter code 1129 on the door. To be honest, I don’t remember where we found it. The main thing is that he doesn’t change either.
- Matthias Kohl's hidden safe- in Matthias Kohl's office there is a hidden safe that does not require a password. We will go to him as part of the additional task Do No Harm. Run the behavioral test on the computer, and then select the answers in the following order: A, C, B, A, C. After this, the picture on the opposite wall will move up and open the safe for you.


- Henrik Devries' safe- The doctor's office is located in the emergency room. To get inside you will have to find a pass (you will find it on the doctor’s corpse while completing the quest to repair the elevator) or upgrade your transformation skill and climb through the window. The safe code is 7324.
- Quarantine zone- the code for this door is 6474. You can get it by reading the letter Subject for Quarantine on Matthias Kohl’s computer in the emergency room. The exact location is shown on the map. On the wall in the quarantine area you will see the code for the previous safe.


- Security safe- a very useful safe next to the shotgun. You can find a drawing of cartridges in it, so don't pass by. The numbers are always the same - 0526. You can see them right there, in the green book of the ICU on the table.
- IT department- the password for this door is always the same - 0913. Unfortunately, we didn’t remember at all at what moment we got it, so we can’t tell you where to find it. You'll just have to trust us.
Shuttle bay
- Pre-flight room- located on the second level of the shuttle bay. You will have to find the door code yourself again. Go to the staff lounge on the second level of the Talos 1 lobby. The exact location is marked on the screenshot. There you will find the corpse of Octavia Figgs. Take her transcript and listen to the audio recording. This is not a drill.


- Mia Bayer's safe- unfortunately, we were unable to find the code for this safe. Having searched the entire shuttle compartment, we still did not understand where the enterprising young lady wrote down her password. Perhaps we will come across it in the future and we will update the guide. Well, for now we just hacked it. There is nothing particularly interesting inside, except perhaps the neuromod.
Hardware laboratory
- Director Thorstein's office- this code is different for each player, so you have to go through it a little. Head to the Atrium on level two, the exact location is marked on the map. You need to find Thaddeus York's computer and read the letter on it titled You're Now in Charge.


- Dr. Thorstein's Safe- the code for this safe is 9954. You can get it by deciphering the note attached next to it with the designation of two chemical elements. Their numbers together will give the code.
Ballistics Department Safe- You can find this code in the same room. Walk along the wall and soon in one of the corners you will come across a grate leaning against the wall. Behind it lies a bunch of pieces of paper, one of which has a code written on it. To move the grate you need the Lifting skill of the first level.


- Mechanical shop storage room- to get this code you will have to go to the Atrium on the second level. Find a computer there called Prototype Testing (its location is marked in the screenshot below) and read the letter called If you need supplies.


Talos skin
- Mechanical shop storage room - There is another storage room on the outside of the station. To get the door code, you need to find Dr. Calvino's transcript (we will get it in the story) and listen to the recording there Tomorrow morning, first thing.
- Dr. Igwe's cargo container- you will come across this container outside the station as part of the story mission. The reference point for searching is the cargo compartment. Code 2312 is written on the container itself, but it must be entered into the docking terminal at the station opposite the container.
Psychotronics Laboratory
- Arsenal- You can find out the code to the arsenal door by releasing test subject Aaron Ingram from the glass chamber right next to it. Code 8714, never changes.


SAGITT
Safe in the magnetosphere control room- the code for this safe can be found in the magnetosphere control toilet. The exact location is indicated on the screenshot. There are several rolls of toilet paper in the cabinet. Move it aside and you will see a note with a code.


Residential section
- A fitness center- you can get the code for this door in two ways. First, you can go to the security terminal and read the letter New code from the gym. The required location is marked on the first screen. Secondly, you can go to the toilet belonging to crew cabins B. In the center on the ottoman there will be a note with a code. The exact location is indicated on the second screen.


- Post office- to get the code for this door, you will have to find Andres Klein's living capsule. Its location is marked on the map. There will be a note inside with the code written on it.


- Fridge- just watch how the cook enters the code when opening the refrigerator. The password is different for each player.
- Directors' Apartments- to get the code for this door, go to the fitness center and find Emma Beatty's computer there. On it you need to read a letter called Personal Training Session. The password will be there. The exact location is indicated on the map.


- Dr. Calvino's Safe- This safe is located inside Dr. Calvino's room in the Living Quarters. Its code does not change - 0523. You can find out by listening to the audio recording on the computer right here in the room.
- Jada Marks' Safe- a very useful safe in which you can pick up the golden Artemis pistol. Find the body of Marietta Kirkos in the Arboretum (the location is indicated in the screenshot below). On her you will find a key card to Jada Marks' room and a transcript. Listen to the recording and find out the code.


Data store
- Ladder- to get the code to enter the stairs, you need to find Zechariah West's computer. It stands almost next to the entrance to the data warehouse. The exact location is shown on the map. There is a note on the table nearby where the code is written. Here you will find a note with a code from Ivy Song’s work computer.


- Safe in data storage- in this department you can find two safes and they have the same codes. To get this password, find Danielle Shaw's computer. There is a note with a password attached to the back of the screen, which is what we need.


Power station
- Reactor compartment- this compartment is located inside the power plant. Its code is always the same, just enter the numbers 3845. To be honest, I don’t remember where we got it from. Perhaps as part of a story mission.
- Reactor security room- this room is located at the very bottom, not far from the reactor control room. Unfortunately, we were never able to find her code, so we simply broke the door. If we come across this password later, we will definitely add this information to the guide.
- Parts warehouse- in order to get the code for this door, you will have to find Duncan Krasikov's transcript. He lies, as one might expect, next to Duncan’s corpse, and a dangerous poltergeist hangs around. Be careful when walking through water, it may shock you. Your goal is marked on the screen below. You need to listen to the recording called Code Change: Parts Warehouse


